Spotlight Setup
- You must perform the Retail Banking setup also with the following installation.
- Customer 360 is now Spotlight.
After the environment and database have been set up, the next step in the Temenos Digital set up process is to import and configure the Quantum Fabric app(s) pertaining to Spotlight.
The following steps describe the process of importing, configuring, and publishing the Quantum Fabric apps.
- Download Artefacts
- Import Quantum Fabric Apps
- Configure Identity Services
- Configure RDBMS Integration Services
- Configure Run-time Parameters
- Configure Campaign Authentication Token
- Setup and Configure Multi Entity Feature
- Configure Licensing Unit
- Multi-Entity Conversion Utility Tool
- Configure Time Zone
- Publish the App
- Configure Security
- Keycloak Setup
Download Artefacts
To download the artefacts required for setting up Quantum Fabric, see Download Software Assets or contact your Temenos representative.
Download the following artefacts:
- Spotlight_App-vx.x.x.zip
See the table to determine the Quantum Fabric apps that must be set up in your system. The Quantum Fabric app file names are suffixed with a <<major_version>>.<<fix_version>> format for every release.
| Quantum Fabric App File | Description | Do I have to install this? | Quantum Fabric App Name | Discovery Path |
|---|---|---|---|---|
KonyBankingAdminConsole-x.x.x.zip
|
This app contains service definitions and implementation to support Spotlight functionality. | This Quantum Fabric app is mandatory for any Temenos Digital functionality to work irrespective of which customer-facing application you are planning to deploy. | KonyBankingAdminConsole | Spotlight_App-x.x..zip\Spotlight_App-vx.x\dist\apps |
Import Quantum Fabric Apps
The following procedure describes the import and publish process for any Quantum Fabric application. Make sure that you are using the appropriate Quantum Fabric applications as described here.
The screens are for representation only. The actual screen may vary depending on the Quantum Fabric application being imported. Select the appropriate application.
Sign in to Quantum Fabric
Sign in to Cloud or On-premise installation of Quantum Fabric. Use the credentials you have obtained during the environment setup process.
Import Quantum Fabric App
- On successful authentication, the Dashboard page is displayed by default.
- Click the Apps icon on the left pane. The Applications page is displayed.
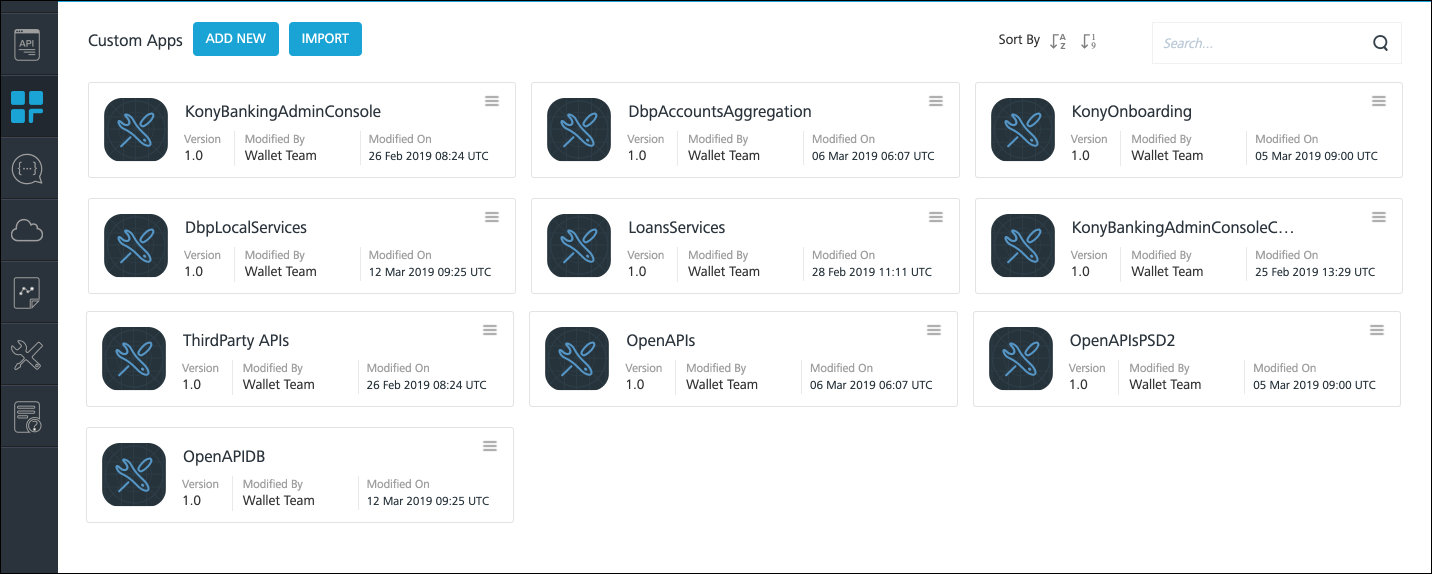
- On the Applications page, click Import. The Import App dialog is displayed.
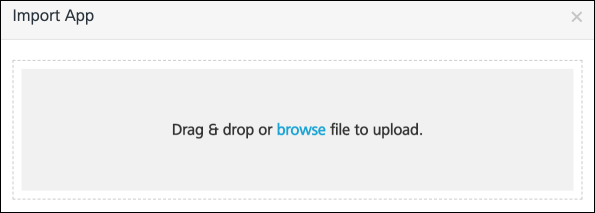
- Browse for Quantum Fabric app package (specified in the list earlier) or drag the app package, and click Import. You must do this for each app in the list in case you have more than one app to import.
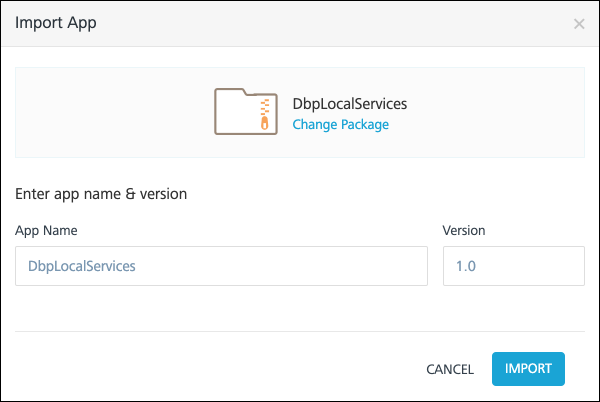
- Under the Import Options, select the Import as new option, and click Import. The app is imported as a new app.
- The imported application is displayed on the Applications page. For detailed information on importing an app to Quantum Fabric Console, refer to Exporting and Importing an Application.
Configure Identity Services
All Quantum Fabric apps available as part of Temenos Digital contain several object, integration and orchestration services. Most of these services are authenticated by identity services. The Quantum Fabric Identity Service(s) for each Quantum Fabric app needs to be configured to reflect the fully qualified URL of the environment on which the service is deployed. The part of the URL occurring before the /services/<Identity Service Name> needs to be replaced with the environment specific values. Please refer to the table below to determine the identity services to be configured.
| Quantum Fabric App | Identity Service Name | Identity Service Type | Description |
|---|---|---|---|
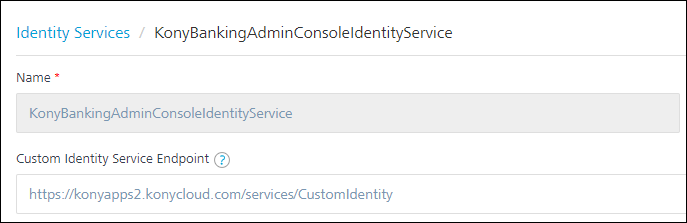
| Compartmentalization | KonyBankingAdminConsoleIdentityService | Custom Identity | The identity service is used to authenticate system users to allow access to Spotlight APIs. |
| KonyBankingAdminConsole | KonyBankingAdminConsoleAPIIdentityService | Custom Identity | The identity service is used by other Quantum Fabric apps to consume APIs exposed by Spotlight |
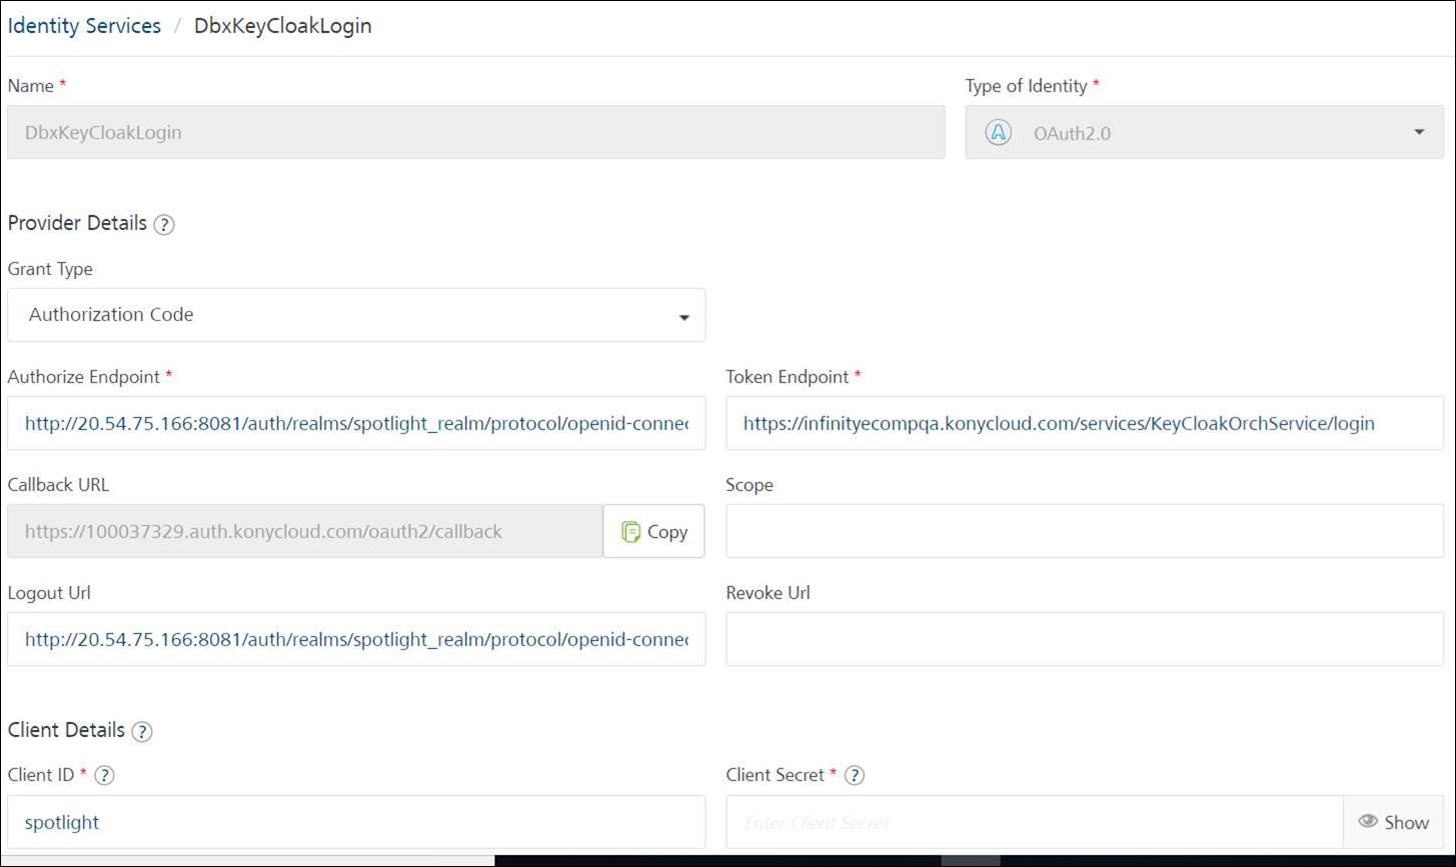
| KonyBankingAdminConsole | DbxKeyCloakLogin | OAuth2.0 | The identity service is mandatory and used to integrate with Keycloak. |
To set the Identity Service configurations, follow these steps:
- Open Quantum Fabric Console.
- From the Left navigation menu, select Apps.
- From the list of apps displayed, select Kony Banking Admin console.
- In the page that appears, navigate to Configure Services > Identity and then select DbxKeyCloakLogin.
- Update the URL in the Custom Identity Service Endpoint field as shown.
- Update the URL in the Authorize Endpoint, Token Endpoint, Logout Url, and Client ID fields in the Provider Details section as shown.
Field Name Field Value Authorize endpoint http://<KeycloakHostURL>/auth/realms/<realm-name>/protocol/openid-connect/auth
Example: http://localhost:8081/auth/realms/<realm-name> /protocol/openid-connect/auth
Logout Url http://<KeycloakHostURL>/auth/realms/ realm-name /protocol/openid-connect/logout
Example: http://localhost:8081/auth/realms/spotlight_realm/protocol/openid-connect/logout
Token endpoint https://<hostURL>/services/KeyCloakOrchService/login
Example: https://<localhost:8080>/services/KeyCloakOrchService/login
Configure RDBMS Integration Services
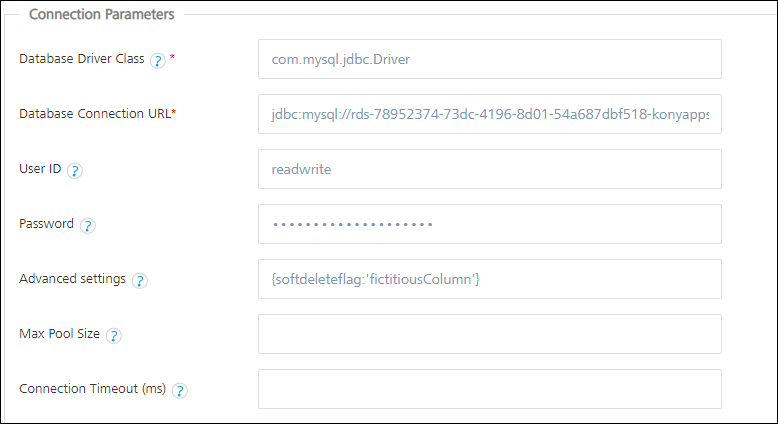
Temenos Digital comes with pre-built integration to the Transact DB whose setup is described here. The following table describes the integration and object services of type RDBMS that must be configured with the database connection parameters for your installation.
| Quantum Fabric App | RDBMS Integration/Object Service Name | Description |
|---|---|---|
| KonyBankingAdminConsole | CRUDLayer | Contains RDBMS services for various Create, Read, Update, and Delete operations on the dbxdb db |
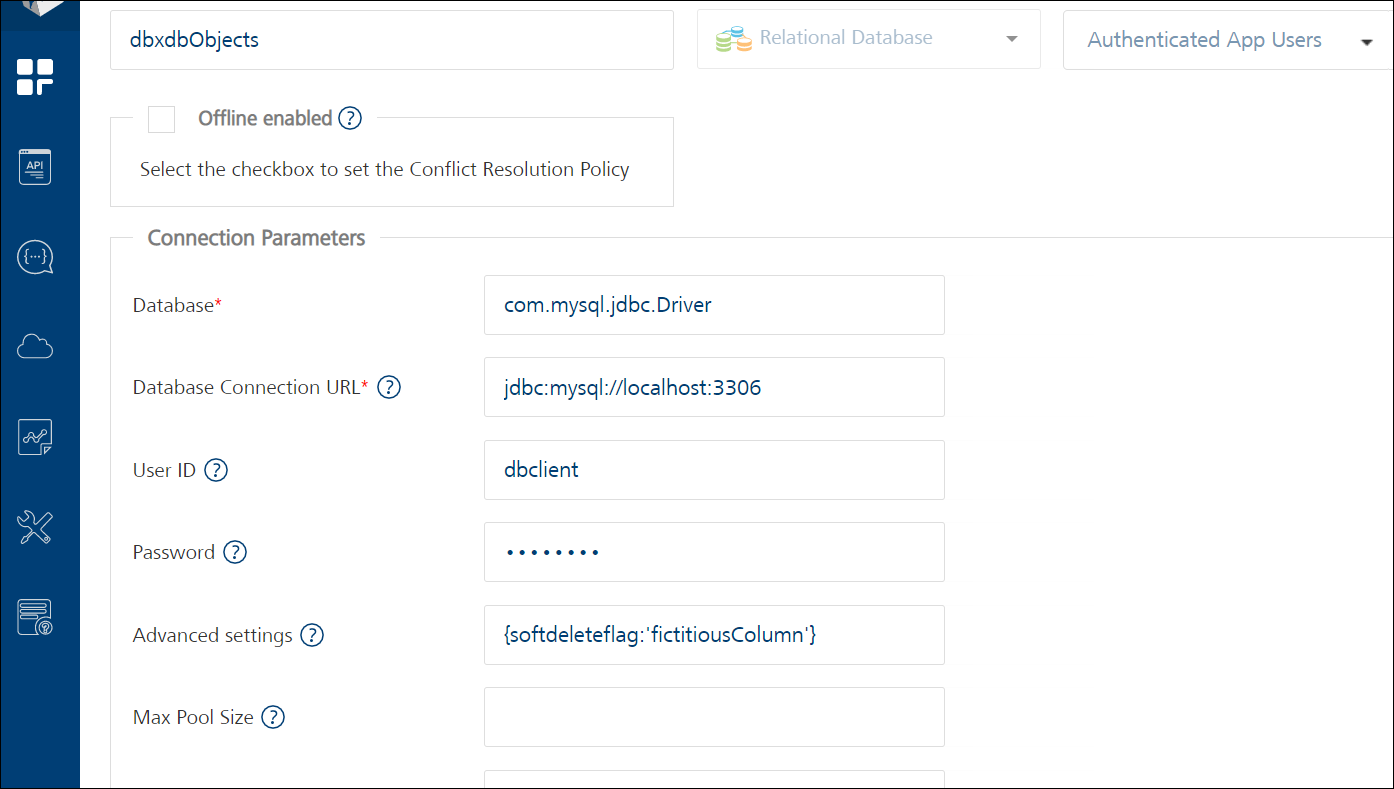
| KonyBankingAdminConsole | dbxdbObjects | Contains RDBMS services for various Create, Read, Update, and Delete operations on the dbxdb db |
Navigate to the RDBMS integration service and modify the connection parameters corresponding to your database environment.
Navigate to the Object service configuration and modify the connection parameters corresponding to your database environment.
Configure Run-time Parameters
The parameters that are specific to each deployment of the Quantum Fabric app(s) are maintained under the Configurable Parameters section of run-time Quantum Fabric environment. Follow these steps:
- Navigate to the environment
- For cloud environments, click
App Services.
- For on-premise environments. click
Server.
- For cloud environments, click
- Navigate to
Settingson the left hand panel. You will now see theConfigurable Parameterssection.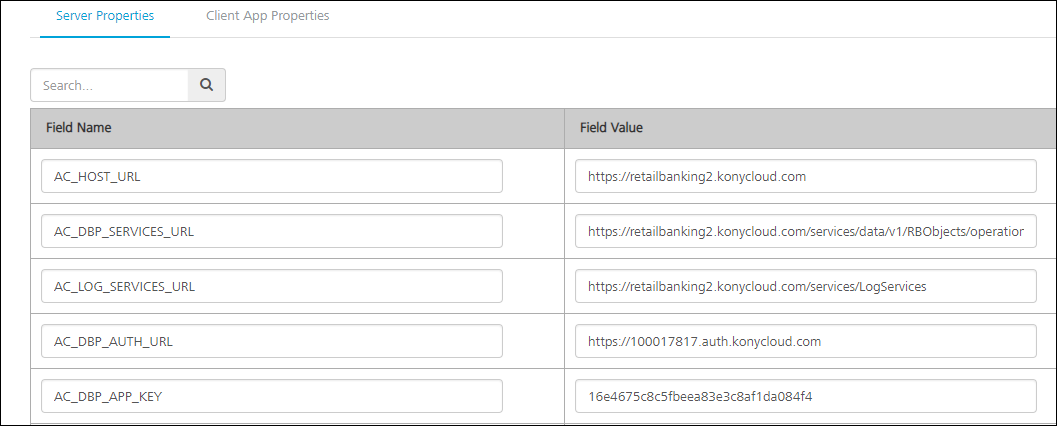
- Under the Server properties section, ensure that the following parameters are configured:
Field Name Description Where do I find this? Scope Is Mandatory? Is Fabric App Republish Required? Sample Value Minimum Applicable Version AC_HOST_URLBase URL of the Quantum Fabric run-time where the Spotlight Fabric App has been deployed - Navigate to the run-time console.
- Extract Host URL from Browser Address URL
Server Yes No https://{baseURL}:portnumber 4.2 AC_APP_KEYApp Key of the published KonyBankingAdminConsoleFabric Application- Navigate to the
PublishTab of theKonyBankingAdminConsoleFabric Application. -
Click on the
Publishedindicator for the App-Key.
Server Yes No Valid app key 4.2 AC_APP_SECRETApp Secret of the published KonyBankingAdminConsoleFabric Application- Navigate to the
PublishTab of the KonyBankingAdminConsole Fabric Application. -
Click on the
Publishedindicator for the App-Secret.
Server Yes No Valid app secret 4.2 AC_DBP_AUTH_REPORTING_PARAMSProvides parameters for X-Kony-Reporting-Parameters header Client specific parameter. Server Yes No {"aid": "ConsumerLending","aname": "ConsumerLending"} 4.2 AC_ONLINE_BANKING_DASHBOARD_URLHost URL of online banking application dashboard Client specific parameter. Server Yes No http://{baseURL}:portnumber/apps/KonyOLB#frmAccountsLanding?session_token= 4.2 AC_ONLINE_BANKING_ENROLLMENT_URLHost URL of online banking enrollment page Client specific parameter. Server Yes No http://{baseURL}:portnumber/apps/KonyOLB#_frmEnroll 4.2 AC_DBP_SERVICES_URLBase URL of the Quantum Fabric run-time where the DigitalBanking-CompositeFabric App has been deployed- Navigate to the run-time console.
- Extract Host URL from Browser Address URL
Server Yes No https://retailbanking.com 4.2 AC_LOG_SERVICES_URLBase URL of the Quantum Fabric run-time on which Temenos Digital Log Services have been deployed - Navigate to the run-time console.
- Extract Host URL from Browser Address URL
Server Yes No http://{baseURL}:portnumber/services/LogServices 4.2 AC_DBP_AUTH_URLAuth URL of the Fabric Workspace on which DigitalBanking-CompositeFabric Application has been configured- Navigate to
PublishTab ofDigitalBanking-CompositeQuantum Fabric Application. - Click on the
Publishedindicator and retrieve the Service URL.
Server Yes No https://{baseURL} 4.2 AC_DBP_APP_KEYApp Key of the published DigitalBanking-CompositeFabric Application- Navigate to the
Publishtab of theDigitalBanking-CompositeFabric Application. - Click on the
Publishedindicator for the App-Key.
Server Yes No Valid key 4.2 AC_DBP_APP_SECRETApp Secret of the published DbpLocalServicesFabric Application- Navigate to the
PublishTab of theDBPLocalServicesFabric Application. - Click on the
Publishedindicator for the App-Secret.
Server Yes No Valid app secret 4.2 AC_DBP_SHARED_SECRETShared Secret of the Identity Service exposed by DigitalBanking-CompositeFabric ApplicationValue configured for the key DBP_AI_ACCESS_BY during the setup of the DigitalBanking-Composite Quantum Fabric Application. Server Yes No Valid secret 4.2 AC_FABRIC_LOGIN_USERNAMELogin Id of the user having access to the Fabric run-time hosting the Engagement services Login Id of user having access to the Quantum Fabric run-time hosting the Engagement services Server Yes No Valid username 4.2 AC_FABRIC_LOGIN_PASSWORDPassword of the user having access to the Fabric run-time hosting the Engagement services Password of the user account which was set in the parameter AC_FABRIC_LOGIN_USERNAME Server Yes No Valid password 4.2 AC_EMAIL_TEMPLATE_LOGO_URLURL of Logo to be used in e-Mail Template Resource URL of the Image to be used as the logo in the e-Mail messages sent from Spotlight. The value <<AC_HOST_URL>>/customer360/desktopweb/images/konydbxlogo.pngcan be set here for demonstration purposes.Server Yes No http://{baseURL}:portnumber/adminConsole/desktopweb/images/konydbxlogo.png 4.2 AC_CSR_ASSIST_CL_HOST_URLHost URL of the page to be displayed during the CL CSR Assist scenario of Spotlight. Host URL of the Consumer Lending application Server Yes No https://retailbanking.com 4.2.2 AC_CSR_ASSIST_CO_HOST_URLHost URL of the page to be displayed during the Onboarding CSR Assist scenario of Spotlight. Host URL of the Onboarding application Server Yes No https://retailbanking.com 4.2.4 AC_KMS_URLBase URL of the Quantum Fabric run-time on which Engagement services have been configured - Navigate to run-time console.
- Extract the Host URL from the Browser Address URL
- Append
/kpnsto the extracted value.
Server Yes No http://{baseURL}:portnumber/kpns 4.2 AC_KMS_HOST_AUTH_URLAuthentication URL of Quantum Fabric run-time on which Engagement services have been configured Auth Service URL at the workspace level of the run-time console where the Engagement services are hosted Server Yes No https://{baseURL} 4.2 AC_CSR_ASSIST_OLB_HOST_URLHost URL of the page to be displayed during the OLB CSR Assist scenario of Spotlight. Host URL of the Online Banking application Server Yes No https://retailbanking.com 4.2.2 AC_INTERNAL_API_ACCESS_TOKENSecret token to access the unprotected Integration Services of Spotlight Internal API Access Token configured during the Security Configuration of Spotlight. Server Yes No Valid access token 4.2 AC_LOG_SERVICES_API_ACCESS_TOKENSecret token to access the Log Services Log Services API Access Token configured during the Security Configuration of Spotlight. Server Yes No Valid access token 4.2 AC_ENCRYPTION_KEYToken used to encrypt/decrypt the API Access token Encryption Key configured during the Security Configuration of Spotlight. Server Yes No Valid key 4.2 AC_APPID_TO_APP_MAPPINGMapping between the client application IDs and Temenos Digital applications Mapping between the client application IDs and Temenos Digital applications. Application ID can be found in the Visualizer settings page. Server Yes No {"KonyMobileBankin":"RETAIL_AND_BUSINESS_BANKING","BusinessBanking":"BUSINESS_BANKING",
"ConsumerLend":"CONSUMER_LENDING","ConsumerLending":"CONSUMER_LENDING",
"KonyOLB":"RETAIL_AND_BUSINESS_BANKING","KonyOLBObfuscated":"RETAIL_AND_BUSINESS_BANKING",
"KonyOLBAsync":"RETAIL_AND_BUSINESS_BANKING","InfinityOnboarding":"RETAIL_AND_BUSINESS_BANKING"}
4.2.4 LOG_RETENTION_PERIOD_IN_MONTHSRetention period of the Audit Logs Client specific parameter. Must be an Integer value. Server Yes No 6 4.2 DBX_SCHEMA_NAMESchema name of Temenos Digital database. Client specific parameter Server Yes No dbxdb 4.2 LOG_DATASOURCE_JDBC_URLJDBC URL of the Database to which the Audit Log statements are to be added/retrieved. For SQL Server, database name is one and schema are two. The database name must be used for SQL Server Client specific parameter Server Yes Yes jdbc:mysql://{baseURL}:portnumber/konydbparchivelog?prop1=val1&prop2=val2....&propN=valN21 4.2 LOG_DATASOURCE_USERNAMEUsername of the database user having read/write access to the Log Services schema Client specific parameter Server Yes Yes Valid username 4.2 LOG_DATASOURCE_PASSWORDPassword of the database user having read/write access to the Log Services schema Client specific parameter Server Yes Yes Valid password 4.2 LOG_DATASOURCE_MAX_POOL_SIZEMaximum connection pool size of the log data source Client specific parameter Server Yes Yes 10 4.2 LOG_ARCHIVE_DATASOURCE_JDBC_URLJDBC URL of the database to which the Audit Log statements are to be purged. For SQL Server, database name is one and schema are two. The database name must be used for SQL Server. Client specific parameter Server Yes Yes 4.2 LOG_ARCHIVE_DATASOURCE_USERNAMEUsername of the database user having read/write access to the Archive Log Services schema Client specific parameter. Server Yes Yes Valid username 4.2 LOG_ARCHIVE_DATASOURCE_PASSWORDPassword of the database user having read/write access to the Archive Log Services schema Client specific parameter Server Yes Yes Valid password 4.2 LOG_ARCHIVE_DATASOURCE_MAX_POOL_SIZEMaximum connection pool size of the archive log data source Client specific parameter. Must be an Integer value. Server Yes Yes 10 4.2 MS_CAMPAIGN_MANAGEMENTCampaign Management Temenos Microservices URL T24 services Server Yes No http://{baseURL}:portnumber/ms-campaign-api/api
JWT: http://13.76.33.216:9089/ms-campaign-docker-iris/api
4.2 MS_PRODUCT_MANAGEMENTProduct Management Temenos Microservices URL T24 services Server Yes No http://{baseURL}:portnumber/ms-marketingcatalog-api/api
JWT: http://13.76.33.216:9089/ms-marketingcatalog-docker-iris/api
4.2 AC_APP_ID_ONBOARDINGApp ID used for CSR assist to onboarding app Client specific parameter Server Yes No Onboarding 4.2 AC_EMAIL_TEMPLATE_TEMENOS_LOGO_URLTemenos logo in email template Client specific parameter Server Yes No https://{baseURL}/dbimages/TemenosLogo@2x.png 4.2 REPORTS_ACCOUNT_IDNavigate to Publish Tab of KonyBankingAdminConsle Quantum Fabric Application. Click on the Published indicator and retrieve the accountId from ServiceURL Navigate to Publish Tab of KonyBankingAdminConsle Quantum Fabric Application. Click on the Published indicator and retrieve the accountId from Service URL. Server Yes No No 2020.10 REPORTS_FABRIC_LOGIN_PASSWORDPassword of the user having access to the Fabric reports Password of the user having access to the Fabric reports. Server Yes No Valid password 2020.10 BRANCH_ID_REFERENCEBranch ID reference of microservices Microservices Server Yes No GB0010001 REPORTS_FABRIC_LOGIN_USERNAMELogin Id of the user having access to the Fabric reports Login Id of user having access to the Quantum Fabric report. Server Yes No Valid username 2020.10 REPORTS_FABRIC_URLBase URL of the Quantum Fabric run-time where the Fabric reports are available Navigate to the run-time console. Extract Host URL from Browser. Server Yes No https://manage.kony.com 2020.10 KEYCLOAK_ADMIN_SERVICES_ENDPOINT_URLKeycloak services account endpoint URL. This is used to call admin URL endpoints of Keycloak. Navigate to the Keycloak console. Then, extract the Keycloak host URL and realm-name.
Server Yes Yes http://<KeycloakHostURL>/auth/admin/realms/<realm-name> 2021.01 KEYCLOAK_ENDPOINT_URLKeycloak URL. This is used to call token and user info endpoints of Keycloak. Navigate to the Keycloak console. Then, extract the Keycloak host URL and realm-name.
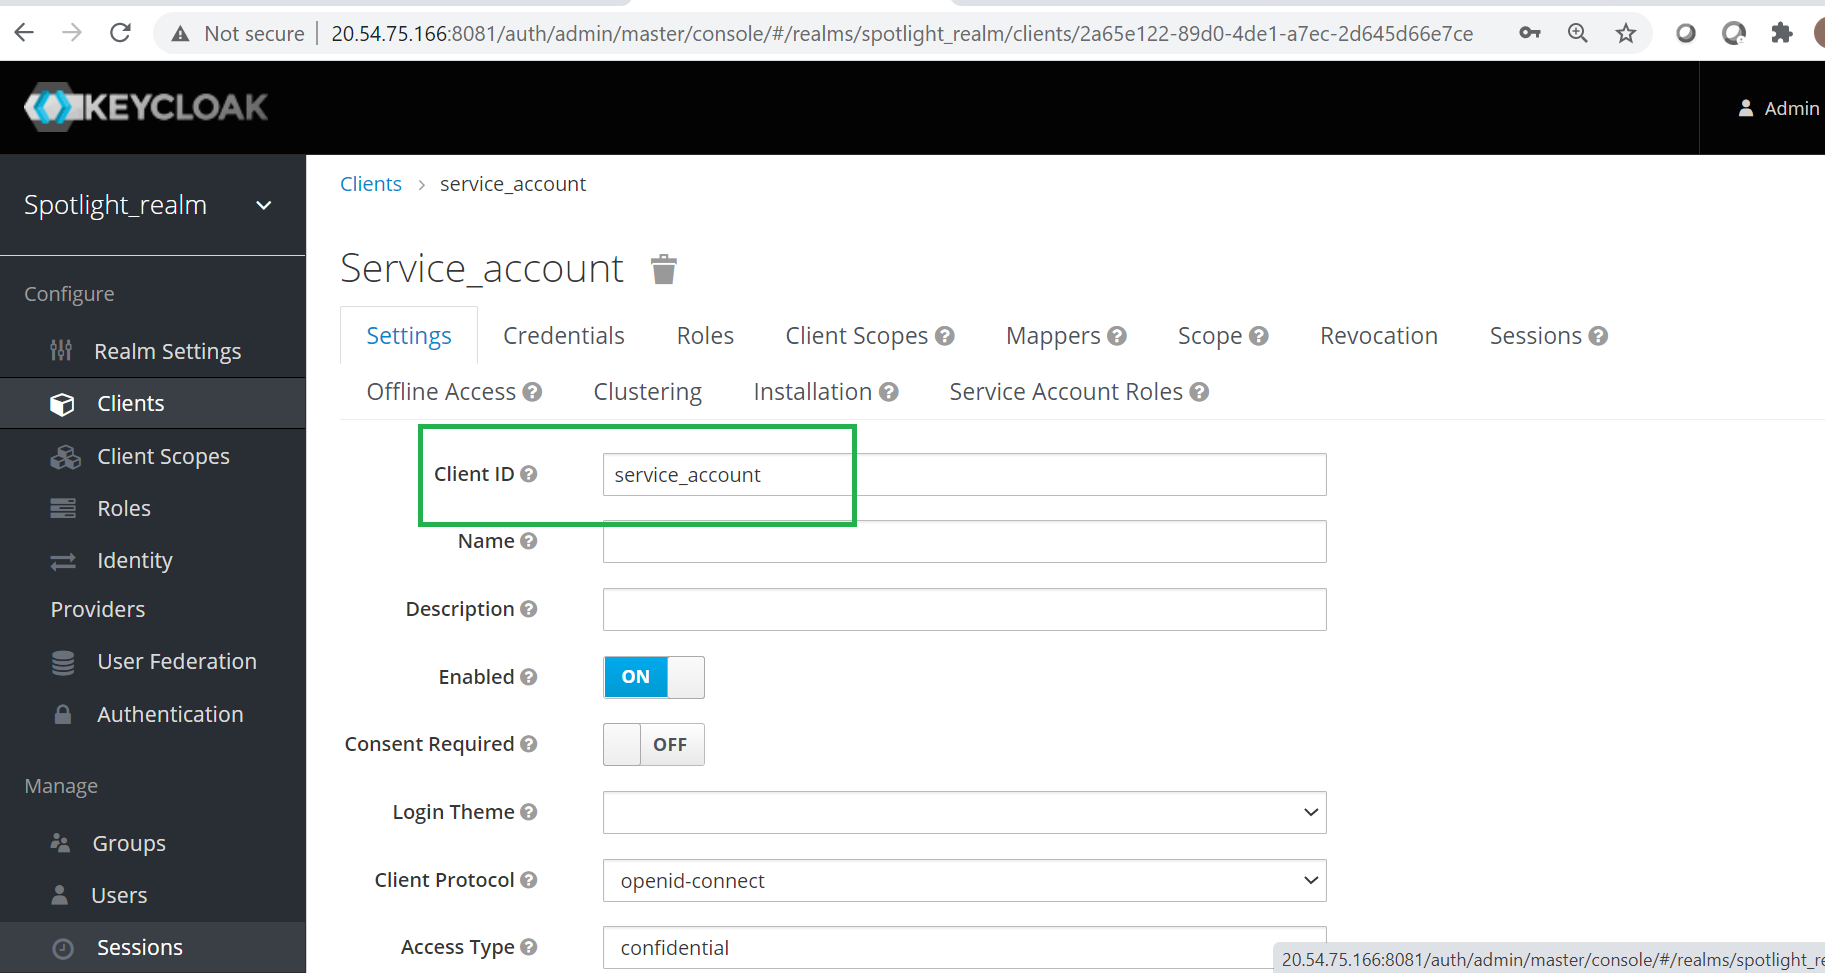
Server Yes Yes http://<KeycloakHostURL>/auth/realms/<realm-name>/protocol/openid-connect 2021.01 KEYCLOAK_SERVICE_ACCOUNT_CLIENT_IDThis is the name of the Keycloak service account client account.
Login to Keycloak console. Navigate to Clients section. Then extract the service account.
Server Yes No Valid service account 2021.01 KEYCLOAK_SERVICE_ACCOUNT_CLIENT_SECRETThis is the Keycloak service account's client secret. Login to Keycloak console. Navigate to Clients > credentials. Then extract the secret.
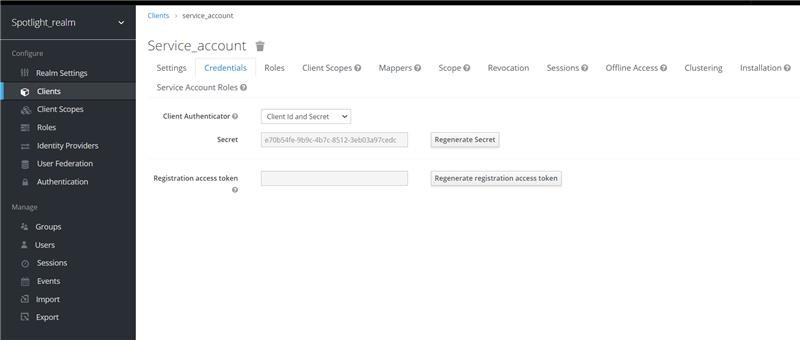
Server Yes No Valid client secret 2021.01 AC_MSG_SUGGESTION_LIMIT Number of customer/service/serviceType to be shown on UI based on text matched Under To of CREATE NEW MESSAGE in Messages module in Spotlight. NA, Increase or Decrease the value based on the number of matched records you wish to show on the UI. Server Yes No 10 2021.07 AC_MSG_CREATE_THREAD_COUNT Number of threads to be created to process the data while sending messages to customers under Messages module in Spotlight. Decide based on system core where App is deployed. Server Yes No 10 2021.07 AC_CSR_ASSIST_OLB_ACC_URL Specific to CSR for a Customer in Spotlight. OLB URL appended with form string /#_frmAccountDetails Server Yes No ${DBX_HOST_URL}/apps/OnlineBanking/#_frmAccountDetails 2021.07 AC_APP_ID_OLB Specific to CSR for a Customer in Spotlight. Launch the OLB and copy the next section of /apps/ */ from URL path. Server Yes No Online Banking 2021.07 SFS_KEYCLOAK_SERVICE_CLIENT_ID Specific to inline service of identity service SFSpotlightLogin in KonyBankingAdminConsole App. This identity is used by Salesforce. Need to obtain from KeyCloak Configuration. Server Yes for SFSpotlightLogin identityService in KonyBankingAdminConsole App. Otherwise No. No salesforce 2021.07 SFS_KEYCLOAK_SERVICE_CLIENT_SECRET Specific to inline service of identity service SFSpotlightLogin in KonyBankingAdminConsole App. This identity is used by Salesforce. Need to obtain from KeyCloak Configuration. Server Yes for SFSpotlightLogin identityService in KonyBankingAdminConsole App. Otherwise No. No AddKCClientSecretForRespectiveClientId 2021.07 KEYCLOAK_SERVICE_REDIRECT_URI Redirect URL configured in KeyCloak against a particular realm. Go inside of DbxKeyCloakLogin Identity service of KonyBankingAdminConsole App. Copy the Callback URL. Server Yes for SFSpotlightLogin identityService in KonyBankingAdminConsole App. Otherwise No. No ${DBX_AUTH_URL}/oauth2/callback 2021.07 AC_TPP_SYSTEM_USER_USERNAME Admin User created to respond with limited permission when a third party calls identity service TPPAuthentication in KonyBankingAdminConsole App. Go to systemuser table in DB and copy the Username against the id UID_TPP. Server Yes for TPPAuthentication identityService in KonyBankingAdminConsole App. Otherwise No. No admintpp 2021.07 AC_TPP_TOKEN_ISSUER iss value to generate jwt token by third party for identity service TPPAuthentication in KonyBankingAdminConsole App. Value needs to be obtained from third party. Server Yes for TPPAuthentication identityService in KonyBankingAdminConsole App. Otherwise No. No Issuer 2021.07 AC_TPP_TOKEN_AUDIANCE aud value to generate jwt token by third party for identity service TPPAuthentication in KonyBankingAdminConsole App. Value needs to be obtained from third party. Server Yes for TPPAuthentication identityService in KonyBankingAdminConsole App. Otherwise No. No Audiance 2021.07 AC_TPP_PUBLIC_KEY Public key used to generate jwt token by third party for identity service TPPAuthentication in KonyBankingAdminConsole App. Value needs to be obtained from third party. Server Yes for TPPAuthentication identityService in KonyBankingAdminConsole App. Otherwise No. No AddPublicKeyAfterBase64Encoding 2021.07 MS_CONSENT_MANAGEMENT Consent Management microservice base URL. Base URL of consent Microservice. Server Yes No Consent MS URL 2021.07 - Under the Client properties section, ensure that the following parameters are configured:
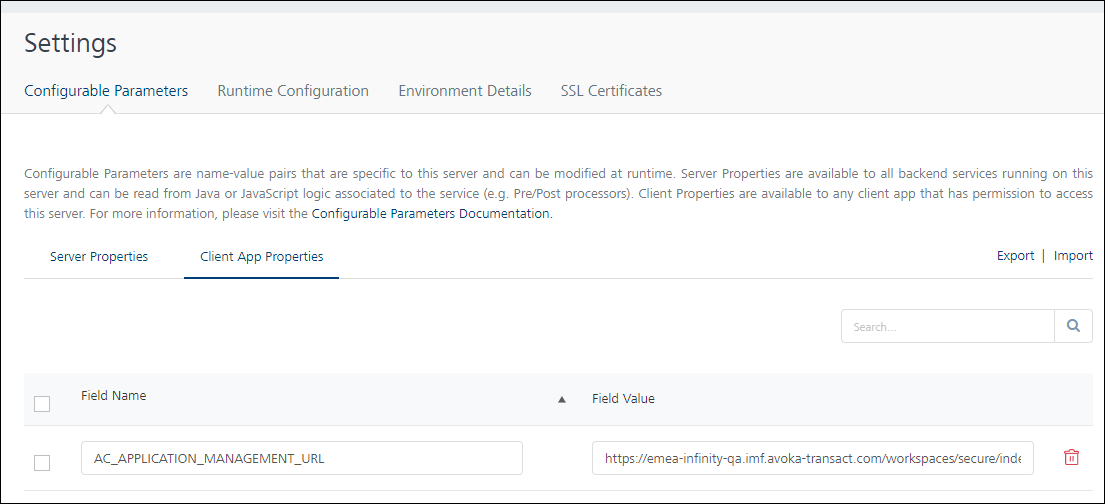
| Field Name | Description | Where do I find this? | Is Mandatory? | Is Fabric App republish required? |
|---|---|---|---|---|
AC_APPLICATION_MANAGEMENT_URL | To navigate to Workspaces or Journey Manager | Will be shared by Workspaces team | Yes | No |
ADVANCED_FEATURE_SELECTION | To enable advanced feature selection. The default value is TRUE and FALSE as part of User Management requirements. | N/A | Yes | No |
KEYCLOAK_HOST_URL | Keycloak base URL | From the Keycloak console, extract the Keycloak hostURL | Yes | No |
SPOTLIGHT_REALM | Keycloak Realm name | From the Keycloak console, extract the realm-name | Yes | No |
OLB_USER_MANGEMENT_FLOW | To set the preferred way of managing users. The possible values are Hybrid, Manual, or Existing. | N/A | Yes | No |
OLB_USER_MANGEMENT_ACCOUNT_LEVEL_SELECTION | To manage the setup access for other users. The possible values are True and False. | N/A | Yes | No |
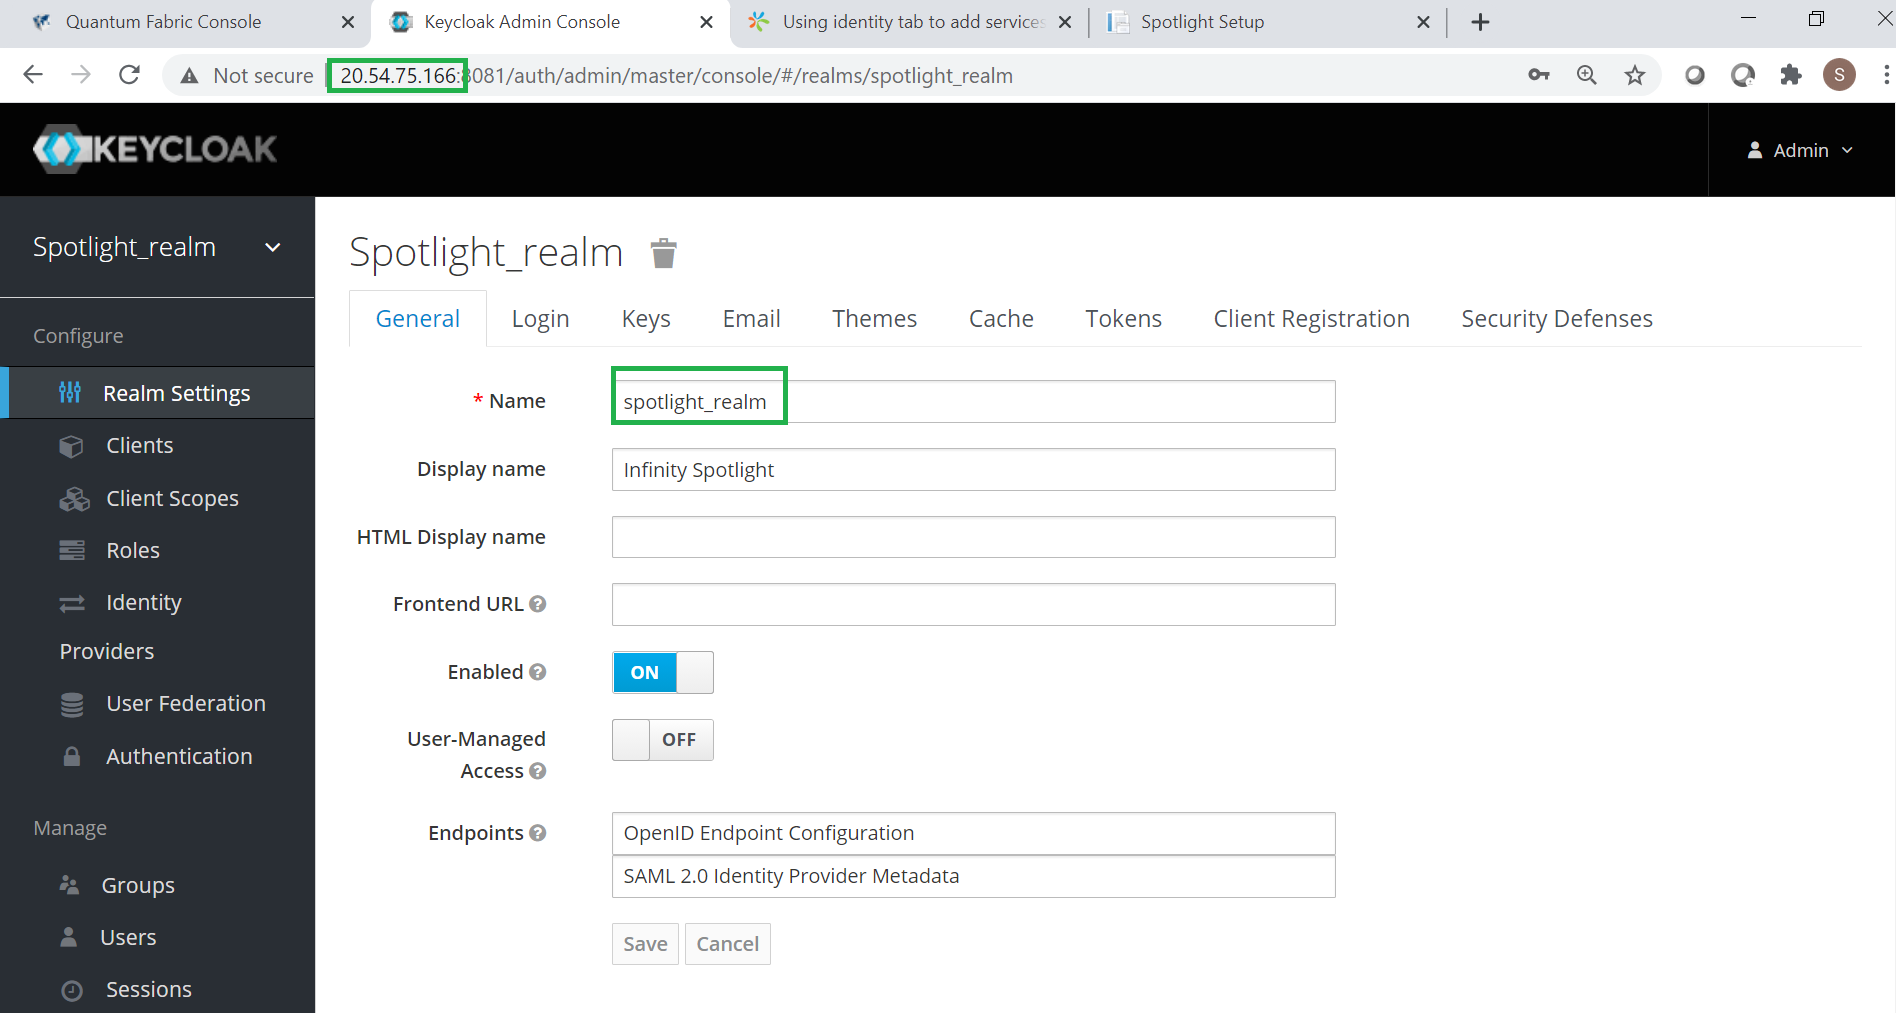
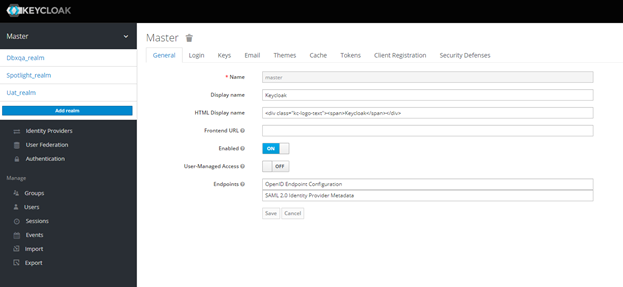
The following are mandatory for the Keycloak setup:
- Ensure that you must add appropriate values for Valid Redirect URL, Admin URL, and Root URL.
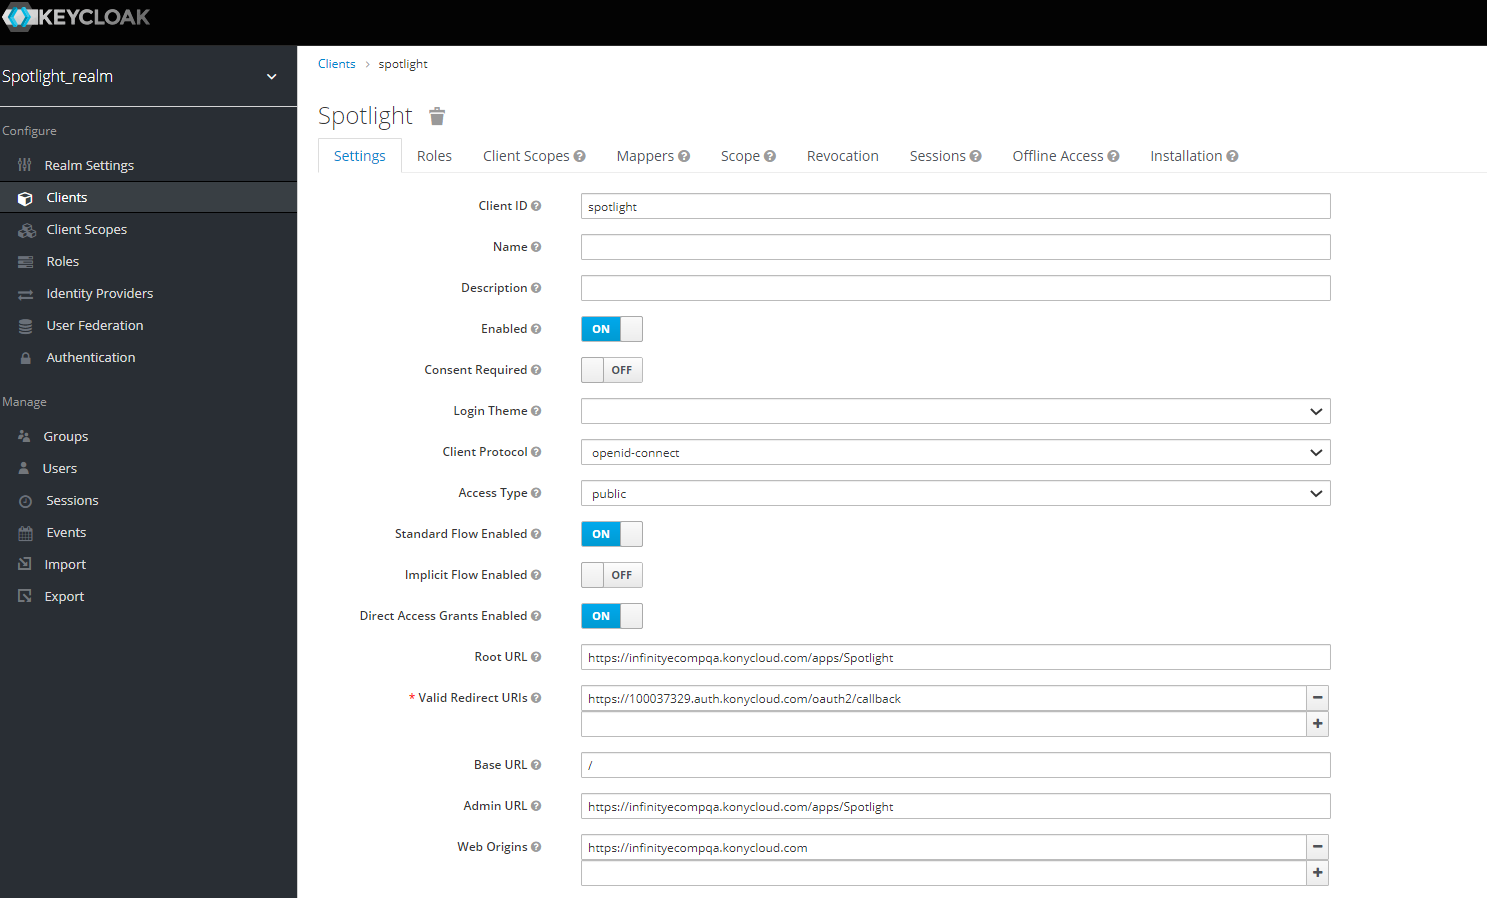
Admin URL is the Spotlight launch URL. Valid redirect URL can be picked from the Callback URL field of the Identity section in Quantum Fabric.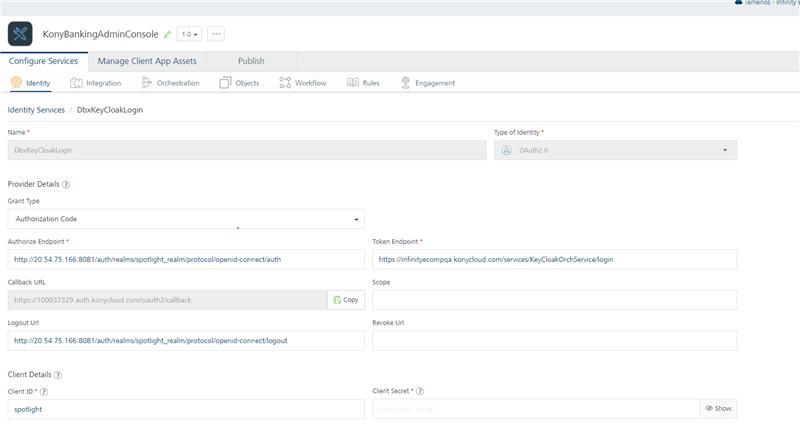
- User should have at least one role associated.
- For user’s management to work the view-users, manage-users, query-users permissions must be added to the user or associated role in the Realm Management.
- While creating a user, these details must be provided for the Spotlight to work: Username, First name, Last name, Email.
- Mappers must be created for roles and user IDs for fetching details
during Spotlight login.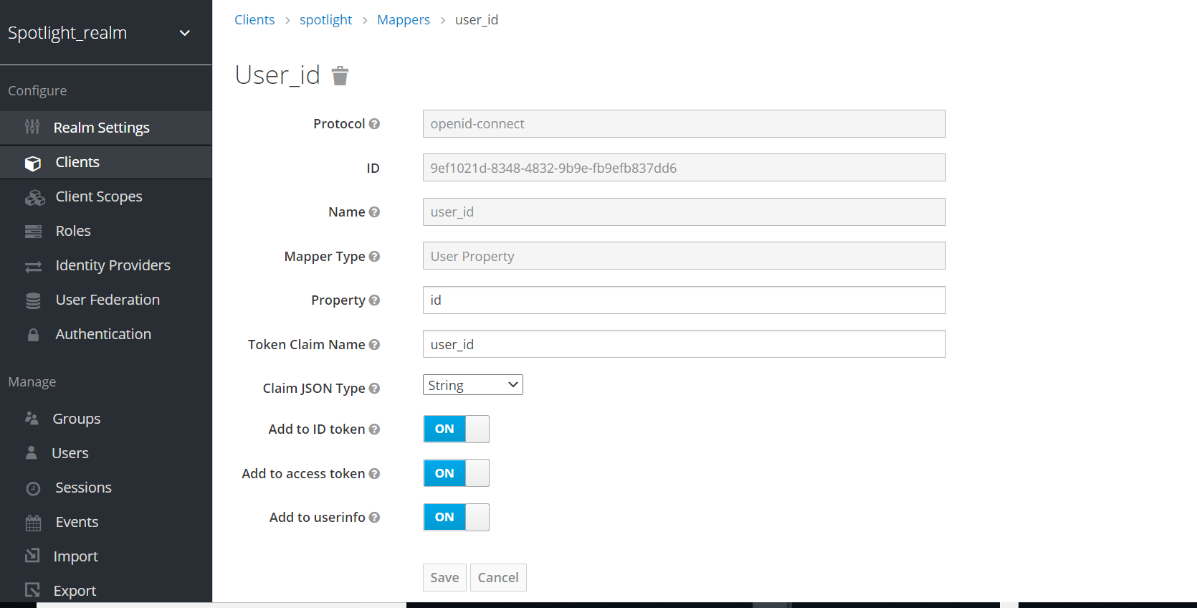
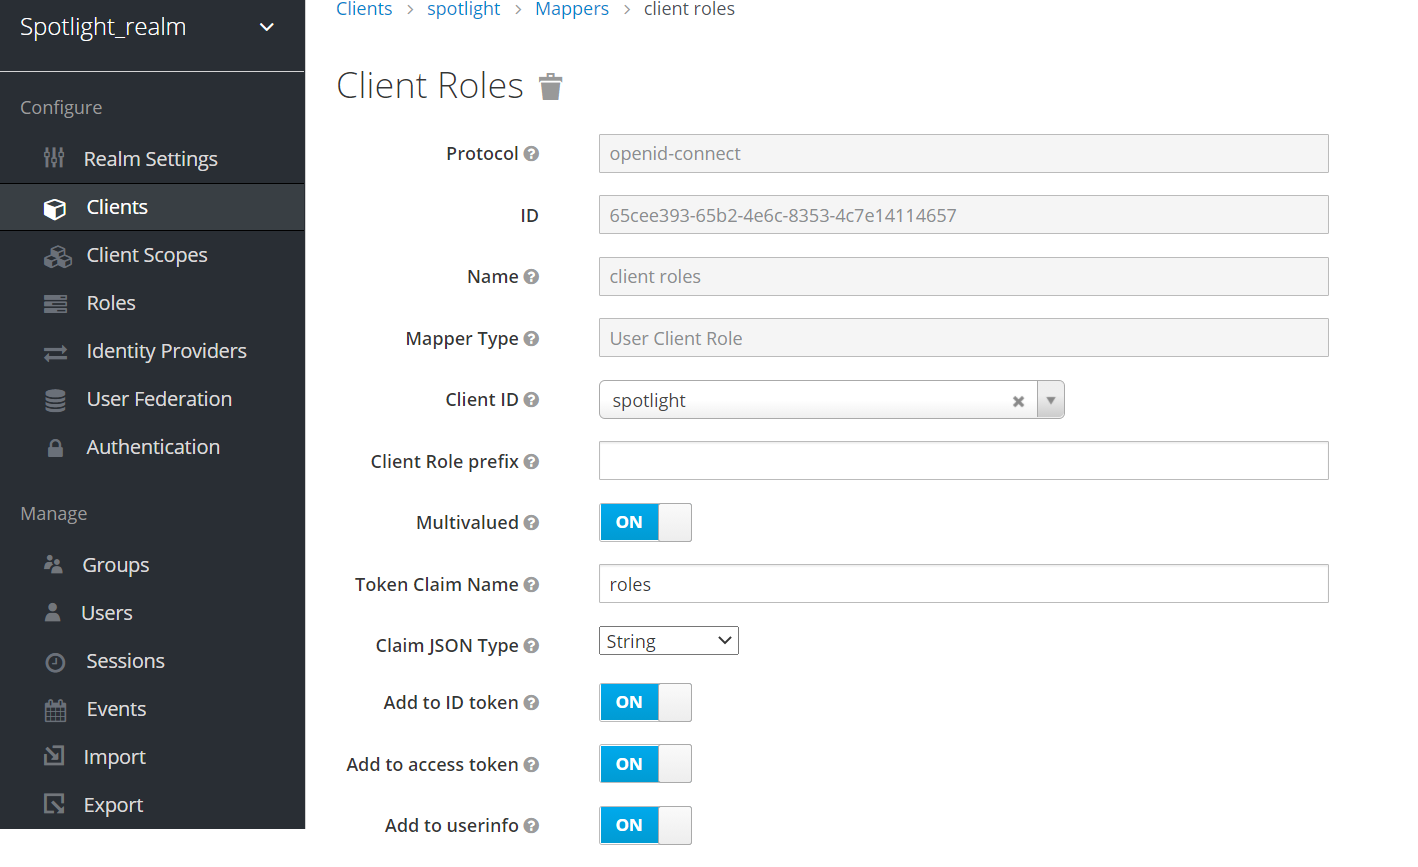
Service account is used for fetching the list of users. Thus, it is mandatory to create a service account.
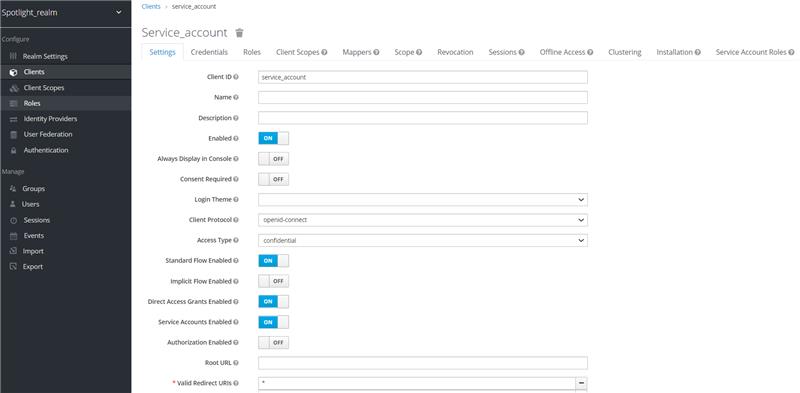
Ensure that you add view-users role to the service account.
For more information about the Keycloak setup and realm creation, refer to Keycloak documentation.
Configure Campaign Authentication Token
Follow the steps to pass authentication token in Campaign JSON services header for Campaign microservice deployment on AWS or Azure.
- Sign in to Quantum Fabric.
- Click the Apps icon on the left pane. The Applications page is displayed.
- Do the following:
- Open the CampaignEngine app.
- Navigate to Configure Services > Integration and then select CampaignService.
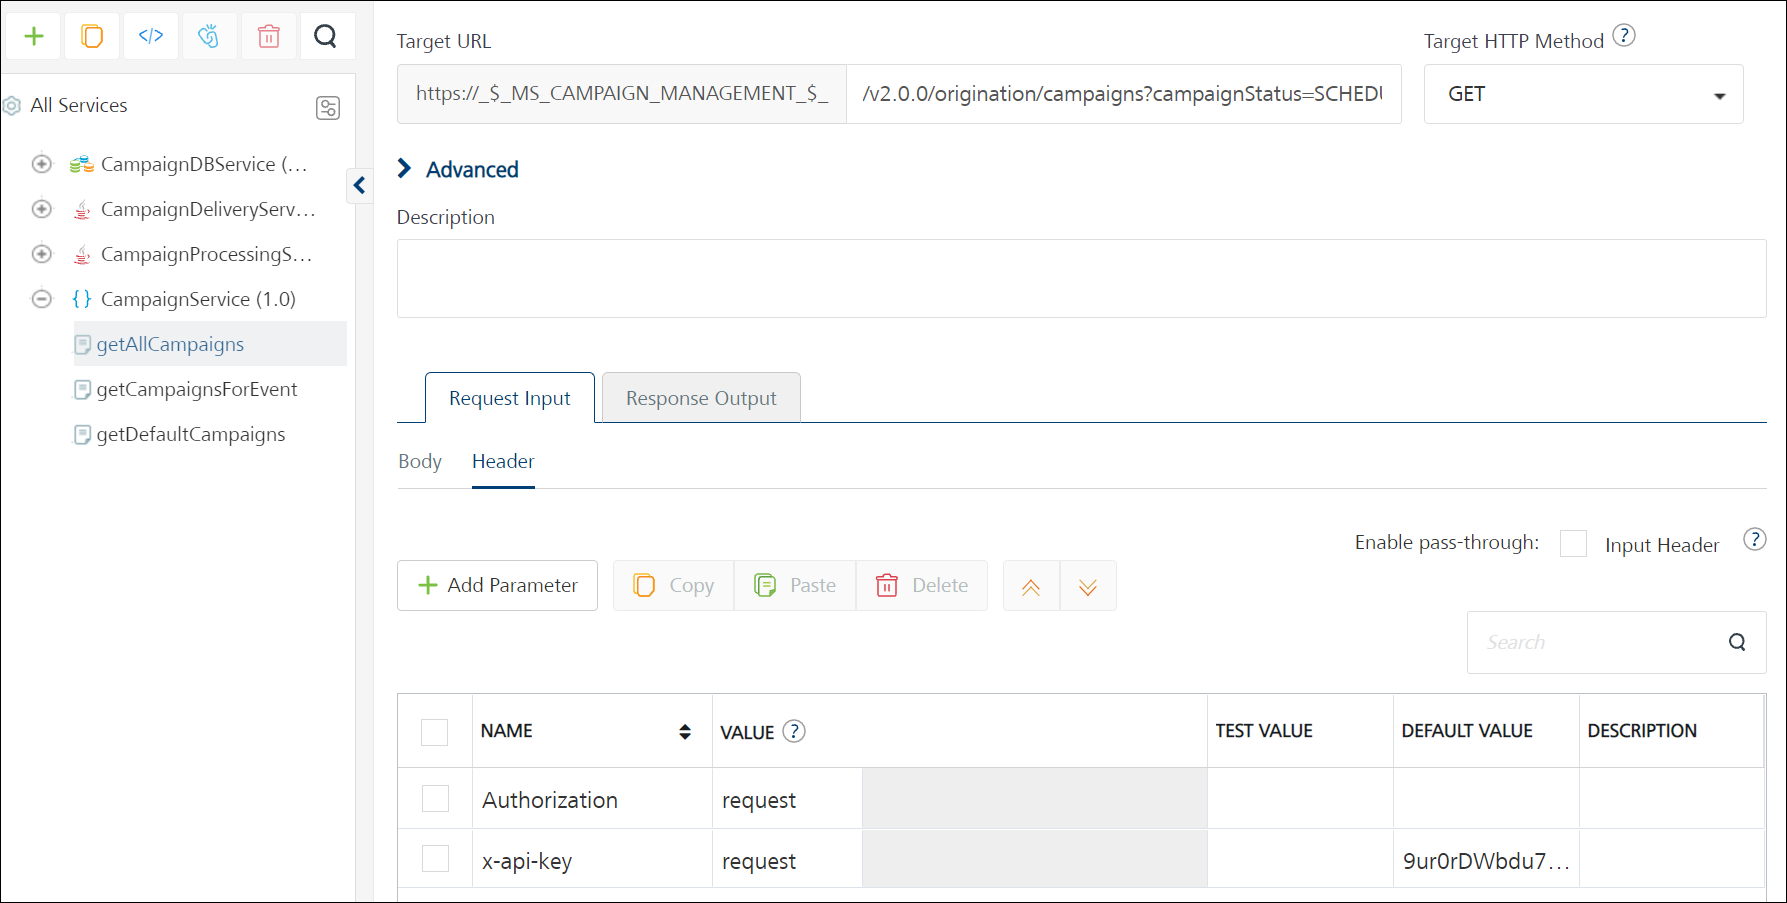
- For each of the operations of the selected integration service (getAllCampaigns, getCampaignsForEvent and more),
- Add "x-api-key" if the Campaign microservice is deployed on AWS.
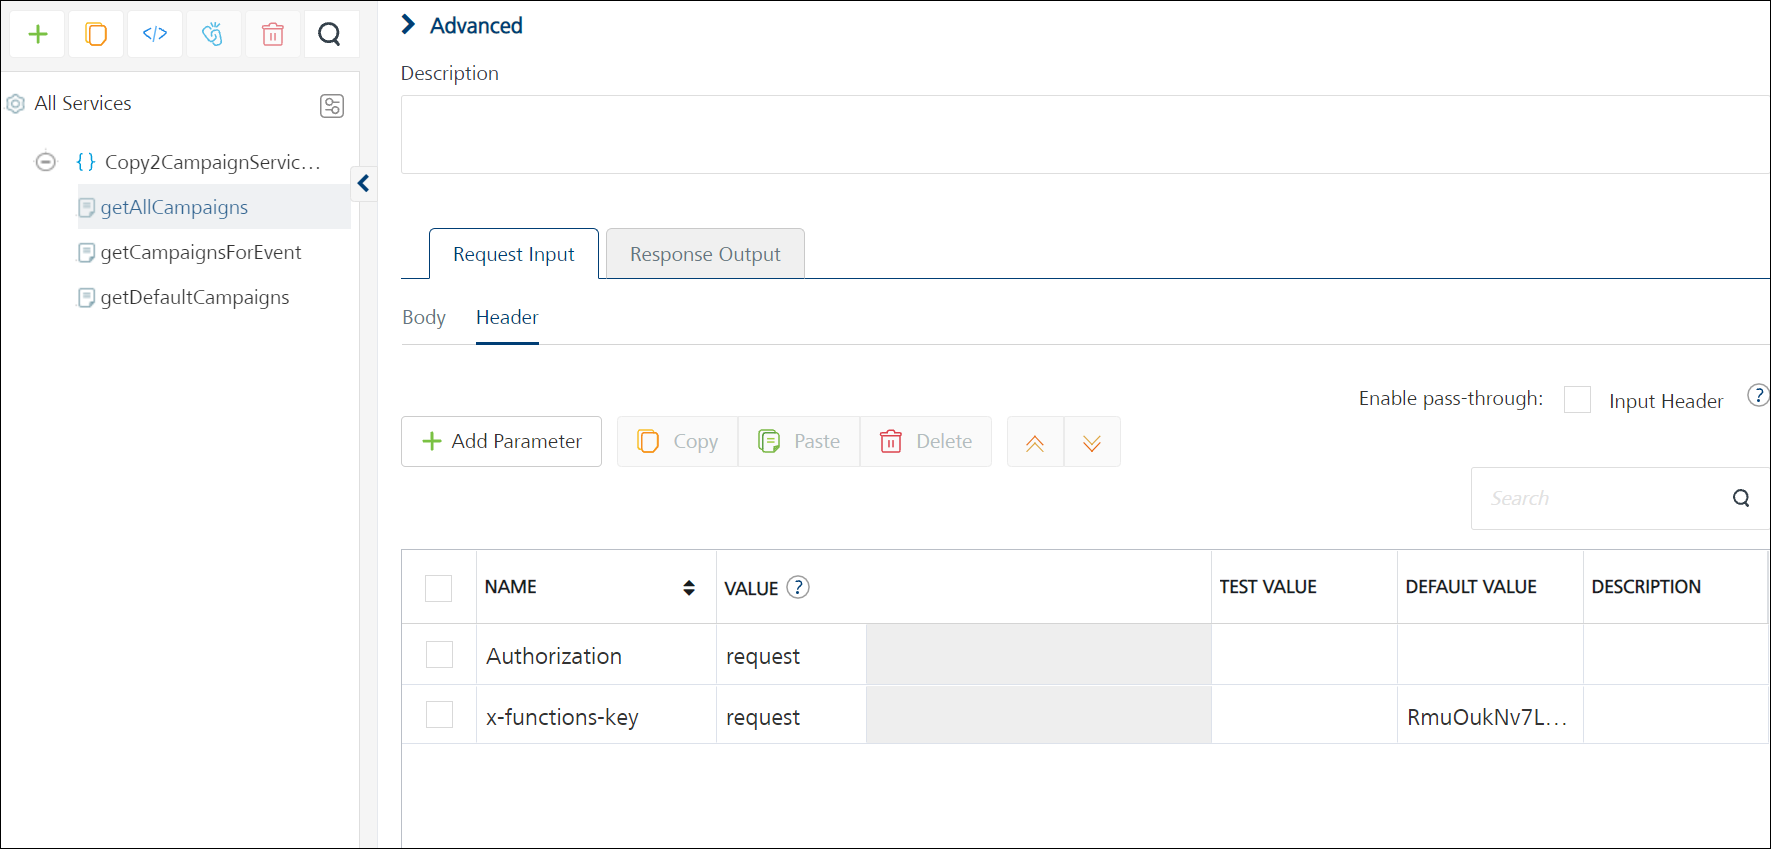
- Add "x-functions-key" if the Campaign microservice is deployed on Azure.
- Open the KonyBankingAdminConsole app.
- Navigate to Configure Services > Identity and then select CampaignManagementMS.
- For each of the operations of the selected integration service (createCampaign, getAllSegments and more),
- Add "x-api-key" if the Campaign microservice is deployed on AWS.
- Add "x-functions-key" if the Campaign microservice is deployed on Azure.
- Open the CampaignEngine app.
- The value that is to be updated for x-api-key and x-functions-key parameters depends on where the Campaign microservice is deployed:
- If the Campaign microservice is deployed on AWS, then the value that is to be updated for x-api-key parameter in the above operations is taken from the AWS Console.
- If the Campaign microservice is deployed on AZURE, then the value that is to be updated for x-functions-key parameter is taken from the Azure portal. Make sure to take the master key.
AWS deployment
Azure deployment
Setup and Configure Multi Entity Feature
Enable Multi Entity Feature
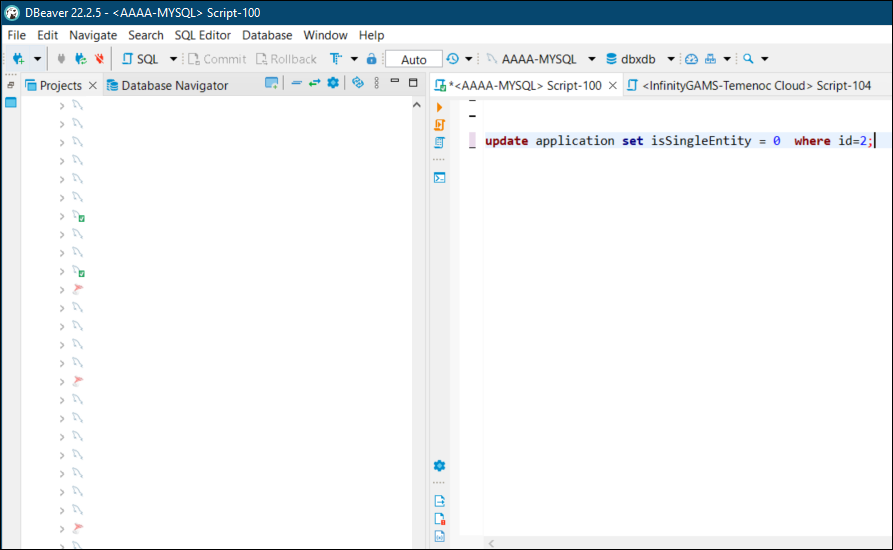
To enable the Multi Entity feature, modify the isSingleEntity column in the application table to zero.
update application set isSingleEntity = 0 where id=2;
Configuring ORDMS details
The following are the Fabric Server configurations related to ORDMS.
| Key | Value |
|---|---|
| ORDMS_AUTHORIZATION_KEY | authorization key |
| ORDMS_DEPLOYMENT_PLATFORM | docker |
| ORDMS_HOST_URL | http://52.169.75.162:8015/ms-organisationalrefdata-api |
Configure Licensing Unit
Metering MS must be configured in Fabric by adding the following server properties (generally, these are taken into account during deployment).
| Key | Value |
|---|---|
| METERING_MS_AUTHORIZATION_KEY | authorization key |
| METERING_MS_DEPLOYMENT_PLATFORM | docker |
| METERING_MS_HOST_URL | http://13.79.129.174:7018/ms-metering-api |
You need to create an app configuration for Temenos Digital so the job can send metrics to the metering store. This can be done with the following API: http://localhost:7018/ms-metering-api/api/v1.0.0/metrics/configurations/applications/INFINITY.
Request Payload:
{
  "configId": 6,
  "metricType": "COUNT",
  "statisticsType": "C",
  "description": "Infinity Application5",
  "additionaldata": {
    "frequency": "",
    "endpoint": "",
    "adapter": ""
  }
}
Sample Response:
{
    "configId": "6",
    "applicationId": "INFINITY",
    "status": "Created"
}
Configure a scheduled job in Fabric Server
- In App Services section, click Jobs. This will display the Job Info page.
In the Job Info page, configure the job properties.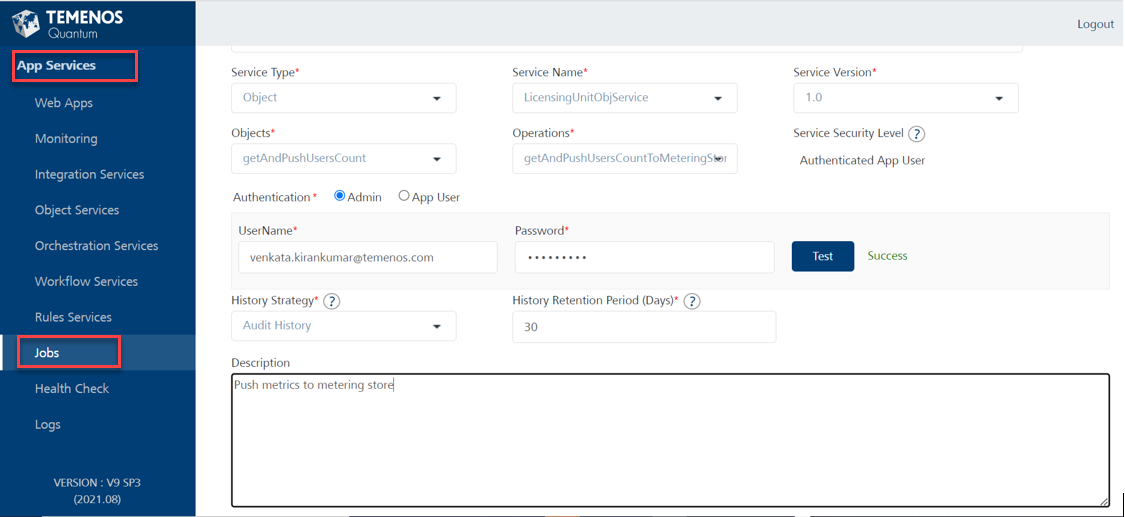
Define notifications - For job failure Email Notifications on Failure.
- Click Define page followed by Get Response tab.
In this tab, define success criteria with the following text"isUpdateSuccessful": "true" - Click Schedule page and select the desired frequency (for example, Every Day), hour and minute at which you want to run the job.

- Click Update.
Multi-Entity Conversion Utility Tool
Prerequisites
- A system on which Java is installed.
- Details of the database connection needed for the tool.
- The database should be accessible from the system.
- A database user with read and write permission.
- The dbxdb database is upgraded to 2023.04 release and should be installed with the UTF8_general_ci collation.
Functionality:
- The upgrade tool is located in the Spotlight artifacts tools folder and runs only on the 2023.04 dbxdb database.
- The tool creates temporary procedures and tables in the dbxdb schema and runs these procedures one by one to update the companyLegalUnit column of the master data tables and customer specific tables. The table list is given in the appendix.
- It updates the application and configuration tables for the single entity configuration.
- Once the execution is successful, all temporary procedures and tables are deleted.
- The tool generates a log file for each execution on the path where the command for the tool is executed. The log contains all information and exceptions for a tool run.
- The tool expects a property file. The property file should contain the following information:
##Assign the below properties for connecting to database:

      db.user=”database username”
      db.password=”database password”
      db.host=”database host url”
      db.port=”database port number”
      db.conn.props=”database encryption properties if anything required”
      db.name=”database name”
      db.type=”database Type (Allowed values : MYSQL/MSSQL)”
      db.schemaName=”schema name”

#infinity version details

			isFreshInstallation=yes/no

			upgradedFromVersion=202210/202301

			upgradedToVersion=202210/202301/202304

			#ConfigValue for config Key: LEGAL_UNITS

			jsonConfigValue =” Entity details in json format”

			#Input LegalEntities

			db.updateLe=”Provide a Legal Entity value that need to be updated in the database”

			db.insertLe=” Provide a Legal Entity value for that data need to be created in the database”
- The tool provides the following operations to complete the upgrade:
- createDbObjects - creates the temporary table and stored procedures.
- updateLegalEntity - if the dB objects are present in the database, this command will update the companyLegalUnit column in all tables.
- validateUpdateStatus - if the dB objects are present, this command will check if a table has the companyLegalUnit value as 'ALL' or 'NULL' and return the status.
- deleteDbObjects - this command permanently deletes the dB objects from the database.
- completerun - This command performs all the above operations in a single go.
- createLEMasterData – if the dB objects are present in the database, this command will create data for the companyLegalUnit in all the tables.
The command for executing the tool:java -Ddb.config="location of the propertyfile" -Ddb.operationname=TypeOfOperationToRun -jar 'JarFileName'
Example Commandjava -Ddb.config="C:\Users\Desktop\test\ConfigPropertiesFolder\config.properties" -Ddb.operationname=completerun -jar MultiEntityDataUpgrade-202301.jar
- In addition to updating the companyLegalUnit value, the tool also updates the following fields as part of the multi-entity setup.
Enable Multi-Entity: Modifies theisSingleEntitycolumn inapplicationtable to '0'.
LegalEntity data configuration:
From R24 onwards the multi-entity configuration for single entity also is stored in DBXDB multi-entity related tables instead of configuration bundle.
Format of the
config_value:[
{
"id": "",
"companyName": "",
"region": "",
"typeId": "",
"parentId": "",
"countryCode": "",
"baseCurrency": "",
"language": "",
"effectiveDate": "",
"closeDate": "",
"description": ""
}
]
Example JSON value: [{"id": "GB0010001","companyName": "Europe","region": "Europe","typeId": "LEGALENTITY","parentId": "GR23698574","countryCode": "EU","baseCurrency": "Euro","language": "EN","effectiveDate": "1990-09-20","closeDate": "2045-09-20","description": "LE for Europe"}]
- When the user is doing fresh installation to 202304 release, the tool will perform the below 202304 dB operations:
Update in all tables: the tool will executedataUpgradeForMultiEntityOLBstored procedure to update companyLegalUnit in all tables.
Insert data in tables: the tool will executeMultiEntityMasterDataCreateProcstored procedure to insert data in all required tables.
Update in customer Table: the tool will executecustomerDataUpgradeForMultiEntitystored procedure and will updatehomeLegalEntitycolumn in customer table.
Insert in customerlegalentity Table: the tool will executecustomerDataUpgradeForMultiEntitystored procedure and will insert data intocustomerlegalentitytable.
Update in alert related tables: the tool will executedataUpgradeForMultiEntityAlertsstored procedure to updatecompanyLegalUnitin all tables.
Insert data in alert related tables: the tool will executeMEAlertsMasterDataCreateProcstored procedure to insert data in all required tables. - When the user is migrating/upgrading from 202210 to 202304 release, the tool will perform the below 202304 dB operations:
Update in customer Table: the tool will executecustomerDataUpgradeForMultiEntitystored procedure and will updatehomeLegalEntitycolumn in customer table.
Insert in customerlegalentity Table: the tool will executecustomerDataUpgradeForMultiEntitystored procedure and will insert data intocustomerlegalentitytable.
Update in alert related tables : the tool will executedataUpgradeForMultiEntityAlertsstored procedure to updatecompanyLegalUnitin all tables.
Insert data in alert related tables : the tool will executeMEAlertsMasterDataCreateProcstored procedure to insert data in all required tables. - When the user is migrating/upgrading from 202301 to 202304 release, the tool will perform the below 202304 dB operations:
Update in alert related tables : the tool will executedataUpgradeForMultiEntityAlertsstored procedure to updatecompanyLegalUnitin all tables.
Insert data in alert related tables : the tool will executeMEAlertsMasterDataCreateProcstored procedure to insert data in all required tables.
DB Change
The table below and the stored procedures are created by the tool.
Added new DB object
Table Name: tablelist
This table is a temporary table created by the tool. It contains the full list of tables needed by the tool to update the companyLegalUnit column.
- Stored Procedures:
dataUpgradeForMultiEntityOLB,MultiEntityReconciliationProcandMultiEntityMasterDataCreateProc. - These procedures are temporarily created by the tool.
dataUpgradeForMultiEntityOLB- This procedure updates the value of companyLegalUnit from 'ALL' to a user-specified value for the legal entity.MultiEntityReconciliationProc- After the upgrade is done, this procedure checks whether all tables have been properly updated with the specified value for the legal entity or not. Then the procedure returns a list of table names if a table still has the value "ALL' or 'NULL" for "companyLegalUnit", otherwise a success message is displayed in the log file.customerDataUpgradeForMultiEntity- This procedure will perform the 202301 dB changes. Updated homeLegalEntity column in customer table and inserts data in customerlegalentity table.customerUpgradeReconcileProc- After customer data upgrade is done, this procedure will verify whether the homeLegalEntity value is updated properly in customer table and data is properly inserted in customerlegalentity table or not.MultiEntityMasterDataCreateProc- This procedure will create the master data for all of the required tables with the legal entity value provided by the user.alertsDataUpgradeReconcile- After upgrade is done, this procedure will verify whether all the alerts related tables are updated properly with the given legal entity value or not, then the procedure will return a list of table names if any table still have companyLegalUnit as ‘ALL’ or 'NULL' else it will show success message in the log file.dataUpgradeForMultiEntityAlerts- This procedure will update the companyLegalUnit value from ‘ALL' to a given legal entity value provided by the user in all alert related tables.MEAlertsMasterDataCreateProc- This procedure will create the master data for all of the required alert related tables with the legal entity value provided by the user.
Java File Changes
New Java project created.
Annexure
- If the migration is happening from 2022.07 to 2022.10, the user may get “Foreign Key Constraint” error. In this case, you need to run the below command to disable the foreign key checks in your database.
SET global foreign_key_checks = 0;
Also, if the user encounters “Foreign Key Constraint” error while executing the upgrade tool, the user needs to disable the foreign key checks by running the above-mentioned query and should re-enable the checks after the upgrade is done. - Tables list which will be updated by tool.
EXEC sp_MSforeachtable @command1="ALTER TABLE ? NOCHECK CONSTRAINT ALL"
| Table Names |
|---|
|
Master Data Tables: |
|
Alerts: |
|
Customer and Contract Tables: |
|
Transaction and Card: |
|
Internal User Roles: |
|
Customer Roles: |
Configure Time Zone
This new Time Zone configuration helps remove the manual changes to update the time zone for daylight savings zones. The client needs to update the time zone of the location. This automatically validates and updates the daylight savings for a particular zone.
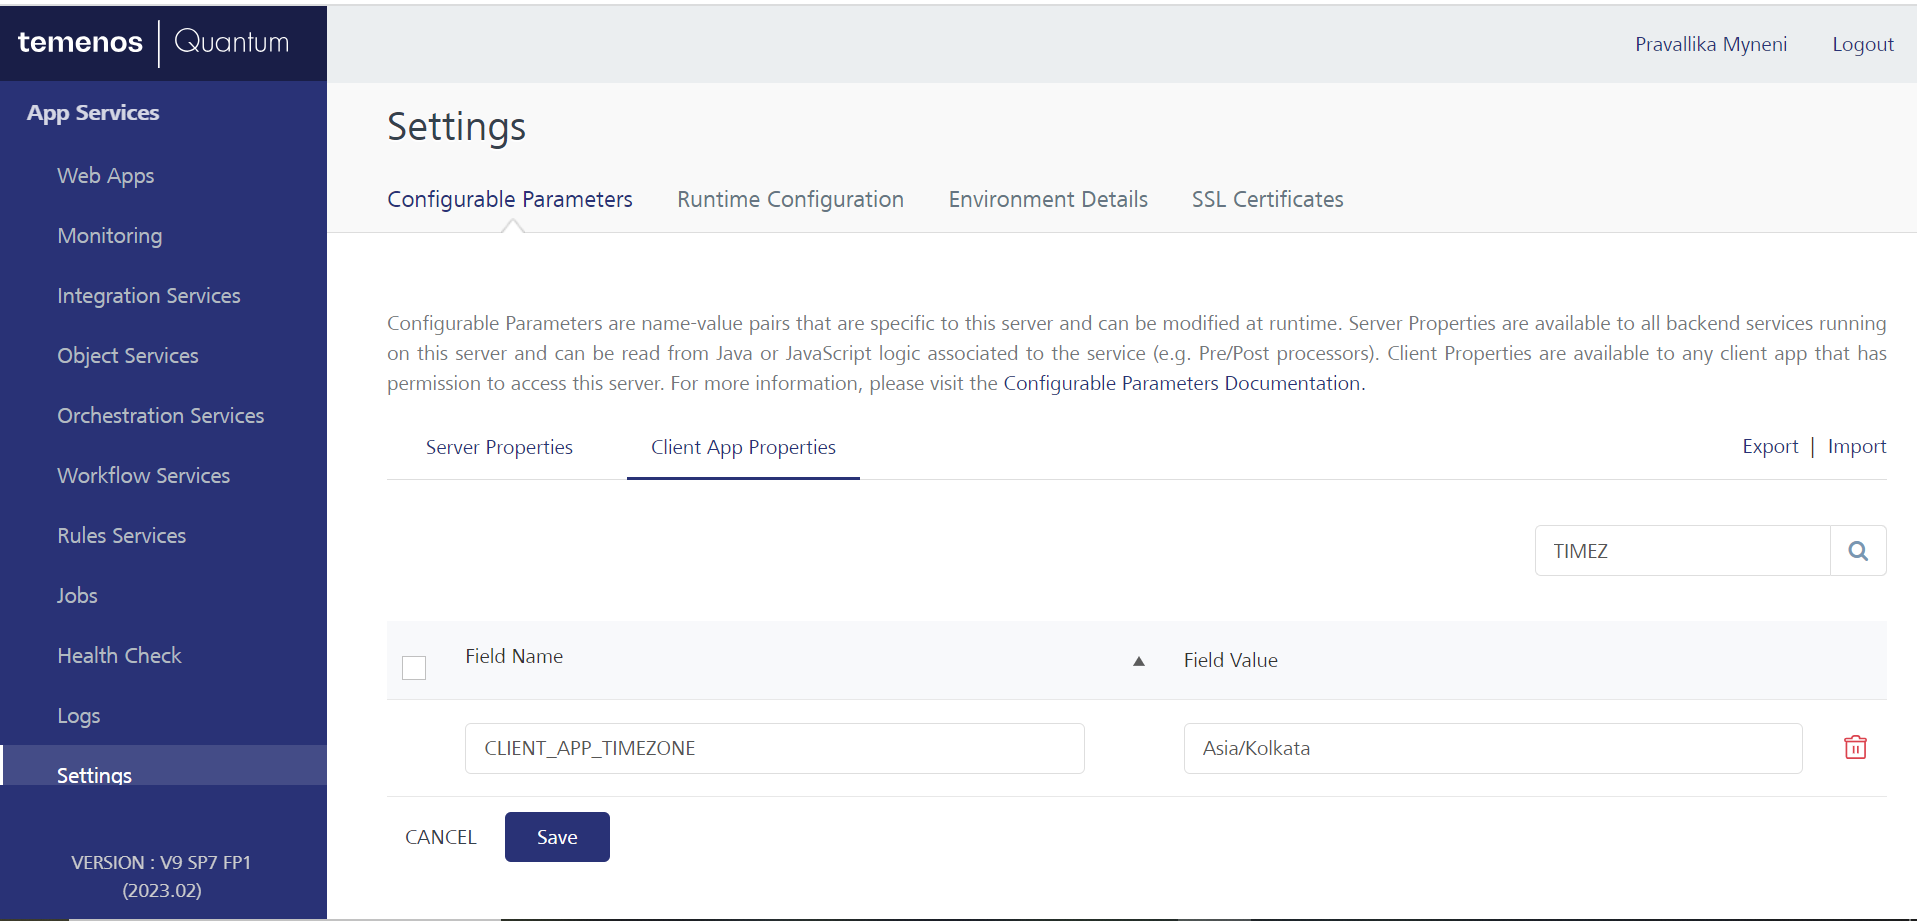
The following is the procedure to update the time zone configuration.
- Sign in to the Fabric console.
- From the left pane, select Environments.
- For your Fabric run-time environment, click App Services.
- Navigate to Settings > Configurable Parameters.
- On the Client App Properties tab, go to CLIENT_APP_TIMEZONE Field Name and set the Field Value depending on the Time Zone (for example, Asia / Kolkata).
- Click Save.
The Spotlight application should reflect the correct time zone based on the DST.
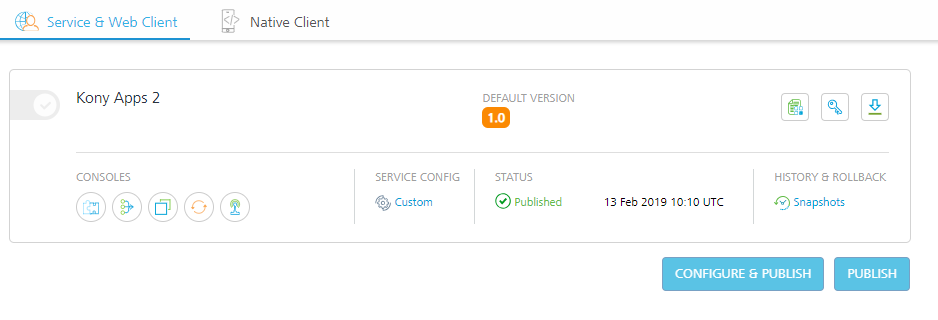
Publish the App
Publish the Quantum Fabric App(s) as per the procedure described here. After a successful publish the status of an application should show up as shown.
Configure Security
Configure Internal API Access Token for Data Services
Spotlight provides a few services that have been configured as public services, as these services are required in the pre-login phase. However, these services are meant to be consumed internally within the Quantum Fabric run-time as server-to-server interactions. Such services are protected by a pre-processor which filters the requests by verifying the header map. This pre-processor expects a particular secret token to be passed as a request header parameter.
As the application is shipped with a pre-configured access token, it is recommended to modify this access token to a strong random string which is usually non-guessable. To perform this change, generate a strong random string containing any characters preferably of at least 16 characters in length. Update this token in the run-time configuration property AC_INTERNAL_API_ACCESS_TOKEN.
Configure Internal API Access Token for Log Services
The DBP Log Service APIs are protected with a pre-processor, which has been designed to allow only those requests having a particular secret token.
As the application is shipped with a pre-configured access token, it is recommended to modify this access token to a strong random string which is usually non-guessable. To perform this change, generate a strong random string containing any characters preferably of at least 16 characters in length. Update this token in the run-time configuration property AC_LOG_SERVICES_API_ACCESS_TOKEN.
Configure Access Token for KonyBankingAdminConsoleAPIIdentityService
The KonyBankingAdminConsoleAPIIdentityService has been designed to securely grant access to specific protected services exposed by Spotlight which are meant to be consumed by other applications of the Temenos Digital suite. Accessing these protected services requires obtaining the X-Kony-Authorization token by invoking this identity service. This identity service expects a secret token to be passed as a header.
This secret token is stored in an encrypted manner in the systemconfigurationtable which is a part of the Temenos Digital database. It is recommended to generate a random encryption key and a new encrypted secret for the same.
-
Generate the Encryption Key. Generate a random non-guessable string of preferably 16 characters in length. Set this token as the run-time configuration property
AC_ENCRYPTION_KEY - Generate a Secret Key. Generate a random non-guessable string of preferably 16 characters in length. The confidentiality of this key must be ensured.
-
Encrypt the Secret Key. Use the
DBXEncryptionUtils-x.x.x.jarto encrypt the shared secret. The JAR to do so be found by navigating to the pathSpotlight_App-vx.x.x/dist/tools. The command to encrypt the shared secret has been detailed below:java -jar DBXEncryptionUtils-x.x.x.jar -e -k "encryptionKey" -t "sharedSecret"
-
Store the Encrypted Secret. Store the encrypted secret in the application database by executing the following DML query. Replace the placeholder
<encrypted_shared_secret>with the actual encrypted secret in the SQL statement and execute it on the application database.UPDATE <adminConsole_schema>.systemconfiguration SET PropertyValue = '<encrypted_shared_secret>' WHERE PropertyName = 'API_ACCESS_TOKEN'; COMMIT;
Configure Access Token for DbxAPIIdentityService
The DbxAPIIdentityService is designed to securely grant access to specific protected services exposed by DigitalBanking-Composite which are meant to be consumed by other applications of the Temenos Digital suite. Accessing these protected services requires obtaining the X-Kony-Authorization token by invoking this identity service. This identity service expects a secret token to be passed as a header.
This secret token is stored in an encrypted manner in the systemconfiguration table which is a part of the DBX database. It is recommended to generate a random encryption key and a new encrypted secret for the same.
- Generate the Encryption Key. Generate a random non-guessable string of preferably 16 characters in length. Set this token as the run-time configuration property DBP_ACCESS_TOKEN.
- Generate a Secret Key. Generate a random non-guessable string of preferably 16 characters in length. The confidentiality of this key must be ensured. This is set as server property AC_DBP_SHARED_SECRET.
-
Encrypt the Secret Key. Use the DBXEncryptionUtils-x.x.x.jar to encrypt the shared secret. The JAR to do so be found by navigating to the path Spotlight_App-vx.x.x/dist/tools. The command to encrypt the shared secret is shown below.
java -jar DBXEncryptionUtils-x.x.x.jar -e -k "encryptionKey" -t "sharedSecret"
-
Store the Encrypted Secret. Store the encrypted secret in the application database by executing the following DML query. Replace the placeholder <encrypted_shared_secret> with the actual encrypted secret in the SQL statement and execute it on the application database.
UPDATE <adminConsole_schema>.systemconfiguration SET PropertyValue = '<encrypted_shared_secret>' WHERE PropertyName = 'API_ACCESS_TOKEN';
COMMIT;
Keycloak Setup
Keycloak Standalone Configurations
- KeyCloak installation zip file can be downloaded from following location:https://github.com/keycloak/keycloak/tags. Check the release matrix for the specific version.
- Extract the downloaded zip file to any specific location.
- Open standalone.xml from location keycloak-<version>\standalone\configuration\standalone.xml for port and ip address changes.
- Change the http or https ports in the xml file based on what ports you want to install the keycloak
<socket-binding name="http" port="${jboss.http.port:8080}"/>
<socket-binding name="https" port="${jboss.https.port:8443}"/> - By default jboss.bind.address will be 0.0.0.0, change it to private ip of the VM under <interfaces> tag.
<interface name="public">
<inet-address value="${jboss.bind.address:10.0.0.4}"/>
</interface> - Add VM domain / host name for remote-destination host. By default it will be ‘localhost’, change it to VM host name. ex :<outbound-socket-binding name="mail-smtp">
<remote-destination host="dev.temenos.com" port="25"/>
</outbound-socket-binding>
- Change the http or https ports in the xml file based on what ports you want to install the keycloak
- Below configurations are required for key cloak setup on HTTPS port only
- Place the certificate jks file at keycloak-<version>\standalone\configuration folder and provide the same under <security-realm name="ApplicationRealm"> tag.
- Provide keystore password for the provided certificate
ex :<server-identities>
<ssl>
<keystore path="cert.jks" relative-to="jboss.server.config.dir" keystore-password="password" />
</ssl>
</server-identities> - Make sure to update the hostname under <server name="default-server"> tag. By default, alias will be ‘localhost’ which needs to be changed to respective domain name.
<host name="default-host" alias=dev.temenos.com">
<location name="/" handler="welcome-content"/>
<http-invoker security-realm="ApplicationRealm"/>
</host>
- Save all the above changes and start the Keycloak server by running standalone.bat from location keycloak-<version>\bin
- Keycloak server can be accessed in browser through url , http://<ipaddress> or <hostname> : <port>/auth
ex: http://10.10.1.4:9081 or https://dev.temenos.com:8443/auth - Create administrative console username and password when above URLis accessed for the first time.
- Login to the Keycloak administrative console with above username and password.
- Download the sample JSON from here. You can use the JSON, the file contains default users and roles which needs to be created in Keycloak for login into the Spotlight application. Unzip the file to view the JSON content.
-
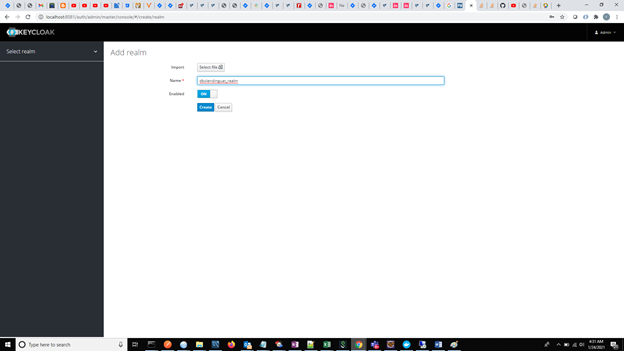
Start the Keycloak server and add a new relam.
-
Provide a name to the realm<RealmName> as per the env and click Create.
- In the realms-export-single-file.json file, make the following changes.
- Replace all occurrences of <RealmName> with RealmName from step 2.
- Generate the user id and credential id fields for users (<USER1_ID>, <USER1_CRED>, <USER2_ID>, <USER2_CRED>). (can be generated online)
- Replace "rootUrl": https://<host_url>/apps/spotlight eg "https://dbxlendinguat.konycloud.com/apps/spotlight"
- Replace "adminUrl": https://<host_url>/apps/spotlight eg "https://dbxlendinguat.konycloud.com/apps/spotlight"
- Replace "webOrigins": [https://<host_url>] eg [ “https://dbxlendinguat.konycloud.com”]
- Replace "redirectUris": [ " https://<auth_url>/oauth2/callback" ] eg [“https://100037329.auth.konycloud.com/oauth2/callback”]
- Navigate to the Import section in the newly created realm and select Import.
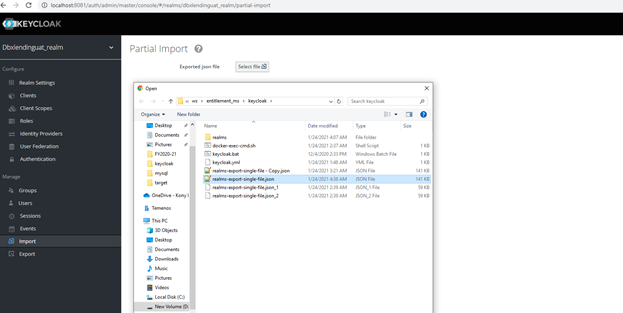
- From the Import from Realm page, Select <RealmName>.
- From the Skip drop-down list, select If a resource exists.
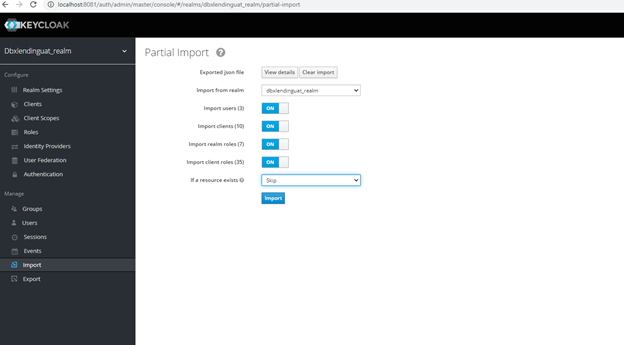
- Click Import.
You can use the realm now. Here is a sample standalone.xml for your reference. Unzip the file to view the xml content.
Keycloak Docker-based Installation
- Install pgAdmin 4 from https://www.pgadmin.org/download/
- Download keycloak.zip and unzip the file.
- Run keycloak.bat which will install required docker images.
- Run the following command
keycloak.bat : keycloak.bat up --build -d
By default keycloak will use 8081 port but if it is being used by some other service then you can change port at the below location keycloak.yml → services → keycloak → ports (line number 26) - Connect to postgress db using pgAdmin4.
- Open pgAdmin4.
- Right-click on Server > Create > Server
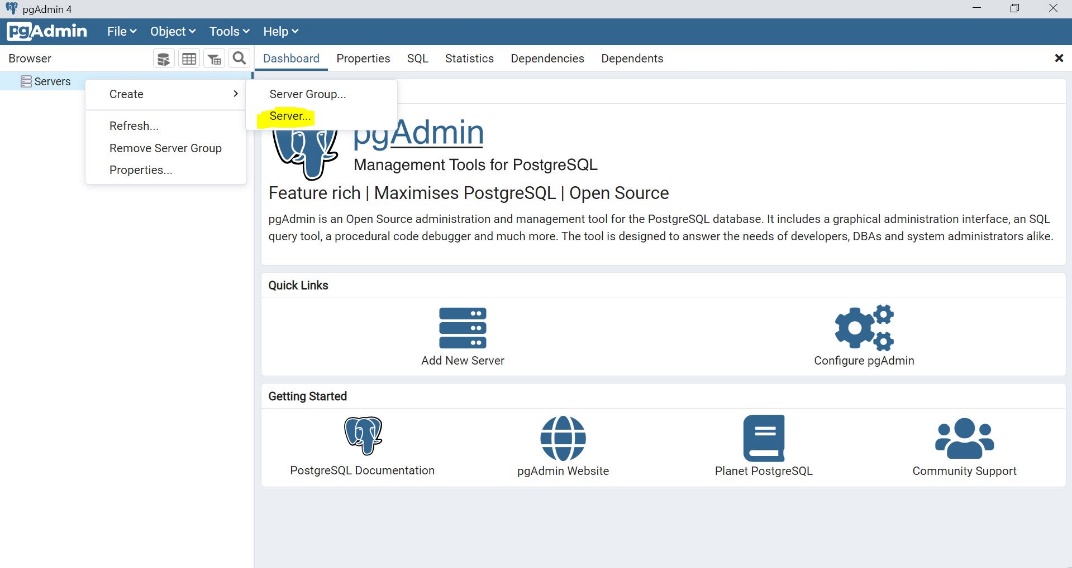
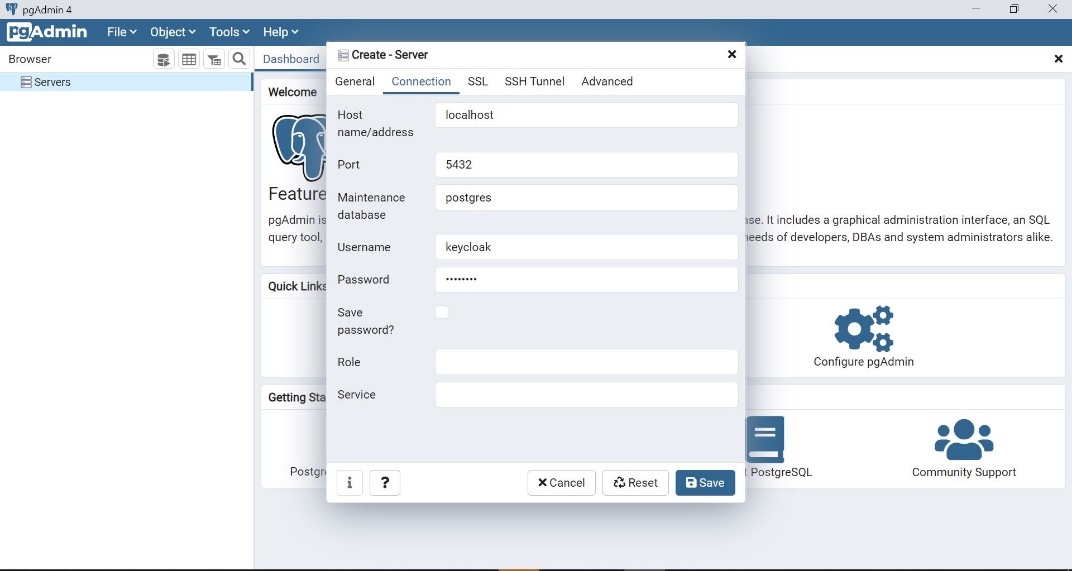
- Give an appropriate name and then go to the General tab.
- Fill hostname, username and password fields from keycloak.yml file and save.
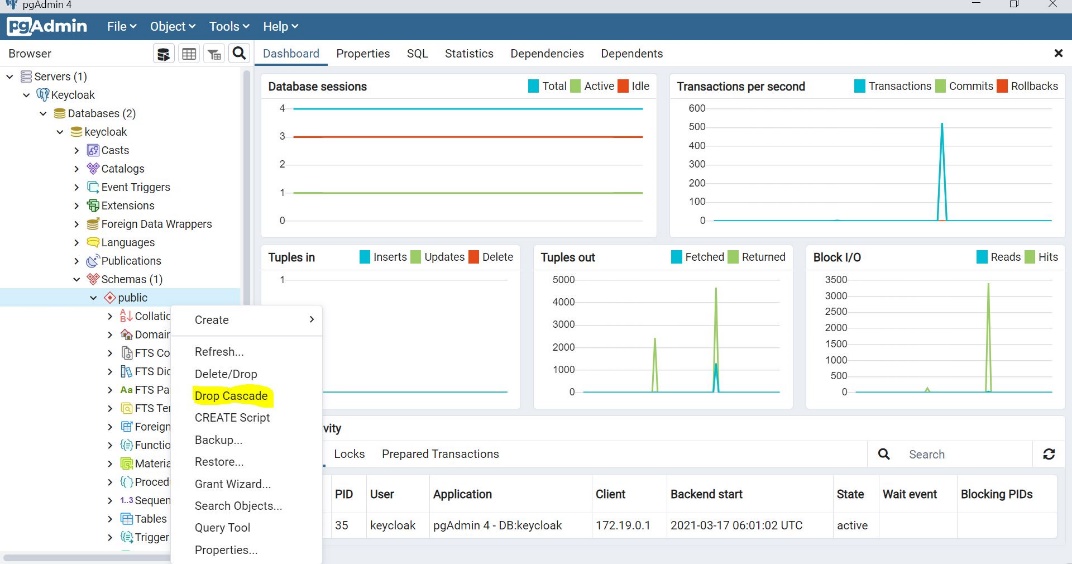
- Drop cascade public schema of keycloak db using pgAdmin 4.
- Configure Keycloak by following instructions from the following sections.
- DB Setup
- Spotlight Setup (Configure Run-time Parameters)
For more information on Keycloak integration in Spotlight, refer Sign In to Spotlight.
Value of Server-App property KEYCLOAK_ENDPOINT_URL should be http://<KeycloakHostURL>/auth/realms/<realm-name>/protocol/openid-connect
In this topic